With just a handful of pantry staples and a few simple steps, you’ll be able to make a shortcrust pastry that is buttery and flaky – perfect for savory quiches, sweet tarts, and pies. It’s straightforward to make, especially if you have a food processor, and better than store-bought options in both taste and texture! This all butter pie crust makes enough pastry for a tart tin up to around 24 x 3 cm / 9.5 x 1.2″ big.

This all-butter pie dough aka shortcrust pastry recipe is a game-changer in the world of baking.
Don’t let the fancy name intimidate you; this flaky, buttery crust is the secret ingredient that takes your tart and quiche from good to gourmet!
Whether you’re a seasoned baker or just dipping your toes into the world of pastry, I promise you’ll find this recipe both easy and oh-so-rewarding!
Quiche Crust is Shortcrust Pastry
Use this recipe if you want to make a homemade, all-butter, quiche crust from scratch.
The term “shortcrust” derives from the baking concept of “short,” denoting pastries characterized by flakiness and a crumbly texture upon cutting. Ideally, a shortcrust pastry should offer a delicate tenderness, allowing for easy slicing, and while it should possess flakiness, it should maintain structural integrity without crumbling into pieces.
A well-made quiche crust ensures that each slice of quiche remains intact during the serving process, preventing it from falling apart.

Ingredients & Substitutions
Shop efficiently (treat this as your grocery list) and gather your ingredients at home without running circles in your kitchen. (i.e. One trip to the fridge to get all your dairy needs.) You can still find the full printable recipe at the end of this post.
REFRIGERATED:
- butter. 226g or 1 cup of unsalted butter. You need very cold butter to make this – that’s the secret to a flaky crust! If you are making a savory dish, you can also use salted butter but omit the additional salt below.
- ice water. Add ice cubes to 1 cup of water. (You won’t need all of these.) You will scoop out about 6 tablespoons of water and will add more as needed. Why ice water? Because it prevents the butter from melting. Tiny bits of butter in pastry equals to a flaky pastry!
PANTRY:
- all-purpose flour. 250g or 2 cups all purpose flour.
- salt. ¼ teaspoon fine sea salt.
SPECIAL EQUIPMENT:
- pie weights. Weights stops base from puffing up and helps reduce pastry shrinkage. If you don’t have pie weights, you can also use uncooked rice grains, dried beans, or even popcorn kernels!
- rolling pin.
Recommended Tools
Here are a few handy tools I used to make shortcrust pastry. As an Amazon Associate, I may earn from qualifying purchases without a cost to you.
- food processor.
- pastry cutter
How To Make Step-By-Step
Using a food processor, the quiche crust dough takes less than 5 minutes to make and it works 100% perfectly! But you can also easily make this manually by hand if you don’t have one.
For steps 1 to 3, I’ve included two instructions: one for using a food processor and the other one by hand. Steps 4 and onwards apply to both.

STEP 1. [FOOD PROCESSOR] In your food processor, add the cold butter cubes, flour, and salt.
[BY HAND] In a clean surface or a medium bowl, whisk the flour, salt, and cold butter. Toss well, separating the cubes and ensuring that they are fully coated in flour.

STEP 2. [FOOD PROCESSOR] Pulse in short bursts until the mixture resembles coarse crumbs.
[BY HAND] Use your hands or a pastry cutter to cut the butter into the flour by pressing the pieces between your fingers, flattening the cubes into big shards. Continue to mix in the fat until until they are like course crumbs.

STEP 3. [FOOD PROCESSOR] With the food processor running using PULSE, gradually add the 6 tablespoons of ice water, one tablespoon at a time, until the dough begins to come together. Be cautious not to add too much water; you want the dough to just hold together when pinched between your fingers.
At this point, transfer the mixture into a clean surface and gently knead the dough until it is properly hydrated, adding more water, 1 tablespoon at a time, until it is properly hydrated.
[BY HAND] Make a well in the center of the flour mixture. Add 6 tablespoons of ice water to the well and toss with your hands to mix the flour and water together. As the flour begins hydrated, gently knead the dough. If it’s not coming together, add more water, 1 tablespoon at a time, until it is properly hydrated.

STEP 4. Form the dough into an even disk. The final dough should be uniformly combined and hold together easily, but it won’t look totally smooth.
Dough that is too dry will be crumbly and won’t hold together. Dough that is too wet will feel sticky or tacky.

STEP 5. Wrap tightly in plastic wrap and refrigerate for 30 minutes.

STEP 6. After chilling the dough, it is ready to be rolled out. Lightly flour the dough, your rolling pin, and work surface. Begin to roll the dough by positioning the rolling pin in the center of the dough, then applying gentle pressure and push the rolling pin away from you. Return it to the center and do the same, this time bringing the rolling pin toward you. The trick is to always start from the center!
Rotate the dough frequently as your work, and even flip it over to help keep the dough from sticking and also allows you to feel the thickness.
The dough should be 1/8 to 1/4 inch in thickness. Use your pan as a guide when you roll by placing it lightly on top of the dough to help you see if the dough is wide enough for your pan. Aim for a diamater that is 1 1/2 inch bigger than your pie plate to accommodate the depth of the pan.

STEP 7. I like to use the rolling pin to transfer the dough to the pie plate. To do this, place the rolling pin near the edge of the dough closest to you and roll up the dough around the pin. Gently unfurl the dough, centered over the pie plate.
Once you’ve line the pie plate with the dough, use a knife or scissors to trim away the excess dough. The edges of the crust should be flushed with the edge of the pie plate. Press lightly to seal the dough all around.

STEP 8. Dock. Docking means to prick holes in the dough before baking using a pointy end like a fork or skewer.
As the crust bakes, the steam can escape from these holds. When you don’t make these holes, the dough is likely to puff up or form large air bubbles between the pan and dough during parbaking.

STEP 9. PARBAKE. Parbaking means to partially bake a crust before filling it and then baking the pie.
Cut a square of parchment paper that is slightly larger than your pie plate and fill with enough pie weights to come to the rim of the pan. I use ceramic pie weights, but you can also use uncooked rice grains, dried beans, or corn kernels.

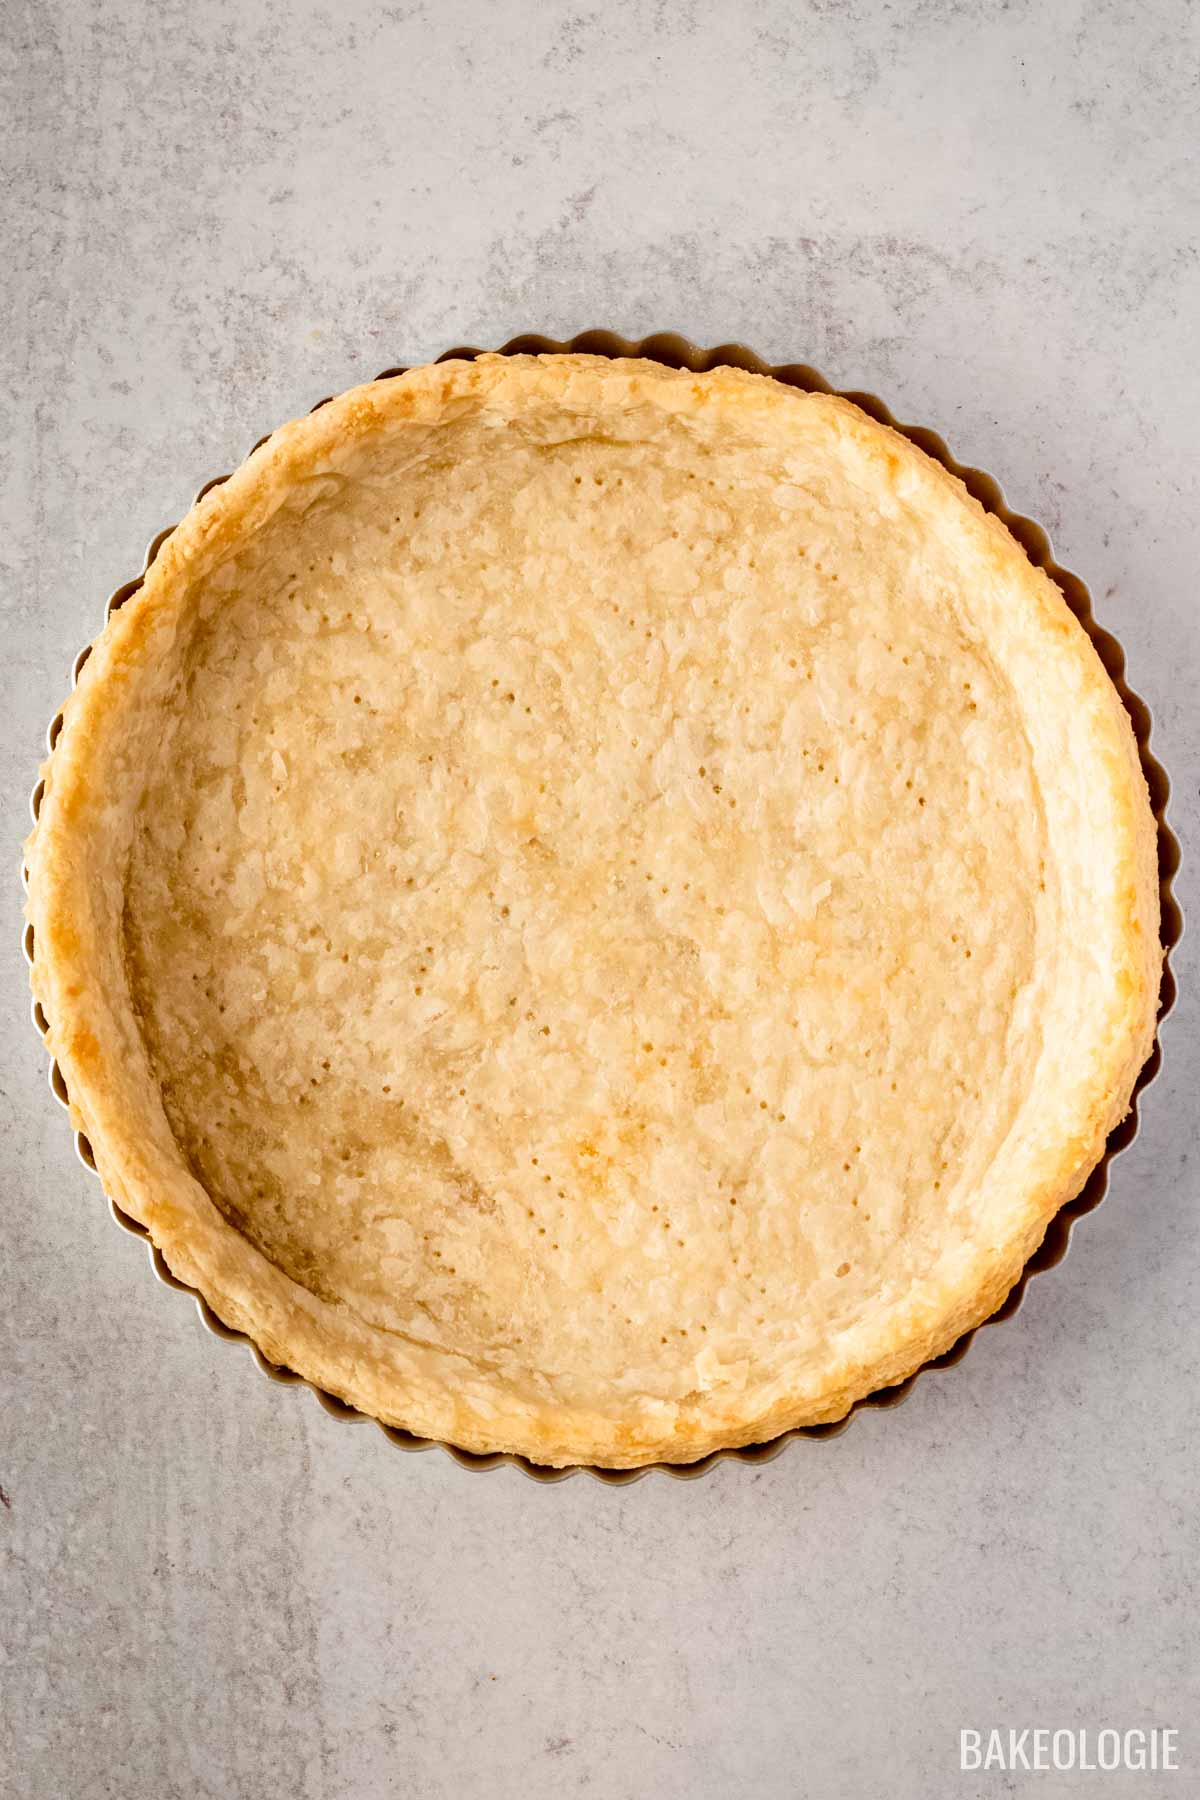
STEP 10. Place on a parchmen-line baking sheet and bake at 390F for 20 minutes. Remove the pan from the oven and use the parchment paper to lift the pie weights out of the crust. Return the pan to the oven and bake for another 5 minutes more. The crust should appear set and with a bit of browning.
You shortcrust pastry is now ready for filling!
Baker’s Notes
- Make Ahead. Shortcrust Pastry can be made ahead up to 2 days. Do steps 1 to 4, then in step 5 you can keep the dough for up to 2 days. When you are ready to use the dough, let it sit out of the fridge for about 15 to 30 minutes to warm up slightly. Fridge-cold dough tends to crack easily when you start rolling it out. Proceed to step 6 to 10.
❤️ Tried this recipe and loved it? If you made this recipe or any other recipe on this site, please leave a ⭐️⭐️⭐️⭐️⭐️ rating + review below – or tag @thebakeologie on Instagram and hashtag it #bakeologie !
Ingredients
- 226g (1 cup) cold unsalted butter
- 250g (2 cups) all-purpose flour
- ¼ tsp fine sea salt
- 6 tbsps ice water plus more as needed
Instructions
- For steps 1 to 3, I’ve included two instructions: one for using a food processor and the other one by hand. Steps 4 and onwards apply to both.[FOOD PROCESSOR] In your food processor, add the cold butter cubes, flour, and salt.[BY HAND] In a clean surface or a medium bowl, whisk the flour, salt, and cold butter. Toss well, separating the cubes and ensuring that they are fully coated in flour.226g (1 cup) cold unsalted butter250g (2 cups) all-purpose flour¼ tsp fine sea salt
- [FOOD PROCESSOR] Pulse in short bursts until the mixture resembles coarse crumbs.[BY HAND] Use your hands or a pastry cutter to cut the butter into the flour by pressing the pieces between your fingers, flattening the cubes into big shards. Continue to mix in the fat until until they are like course crumbs.
- [FOOD PROCESSOR] With the food processor running using PULSE, gradually add the 6 tablespoons of ice water, one tablespoon at a time, until the dough begins to come together. Be cautious not to add too much water; you want the dough to just hold together when pinched between your fingers.At this point, transfer the mixture into a clean surface and gently knead the dough until it is properly hydrated, adding more water, 1 tablespoon at a time, until it is properly hydrated.[BY HAND] Make a well in the center of the flour mixture. Add 6 tablespoons of ice water to the well and toss with your hands to mix the flour and water together. As the flour begins hydrated, gently knead the dough. If it’s not coming together, add more water, 1 tablespoon at a time, until it is properly hydrated.6 tbsps ice water
- Form the dough into an even disk. The final dough should be uniformly combined and hold together easily, but it won’t look totally smooth.Dough that is too dry will be crumbly and won’t hold together. Dough that is too wet will feel sticky or tacky.
- Wrap tightly in plastic wrap and refrigerate for 30 minutes.
- After chilling the dough, it is ready to be rolled out. Lightly flour the dough, your rolling pin, and work surface. Begin to roll the dough by positioning the rolling pin in the center of the dough, then applying gentle pressure and push the rolling pin away from you. Return it to the center and do the same, this time bringing the rolling pin toward you. The trick is to always start from the center!Rotate the dough frequently as your work, and even flip it over to help keep the dough from sticking and also allows you to feel the thickness.The dough should be 1/8 to 1/4 inch in thickness. Use your pan as a guide when you roll by placing it lightly on top of the dough to help you see if the dough is wide enough for your pan. Aim for a diamater that is 1 1/2 inch bigger than your pie plate to accommodate the depth of the pan.
- I like to use the rolling pin to transfer the dough to the pie plate. To do this, place the rolling pin near the edge of the dough closest to you and roll up the dough around the pin. Gently unfurl the dough, centered over the pie plate.Once you’ve line the pie plate with the dough, use a knife or scissors to trim away the excess dough. The edges of the crust should be flushed with the edge of the pie plate. Press lightly to seal the dough all around.
- Dock. Docking means to prick holes in the dough before baking using a pointy edge like fork or skewer. As the crust bakes, the steam can escape from these holds. When you don’t make these holes, the dough is likely to puff up or form large air bubbles between the pan and dough during parbaking.
- PARBAKE. Parbaking means to partially bake a crust before filling it and then baking the pie.Cut a square of parchment paper that is slightly larger than your pie plate and fill with enough pie weights to come to the rim of the pan. I use ceramic pie weights, but you can also use uncooked rice grains, dried beans, or corn kernels.
- Place on a parchmen-line baking sheet and bake at 390F for 20 minutes. Remove the pan from the oven and use the parchment paper to lift the pie weights out of the crust. Return the pan to the oven and bake for another 5 minutes more. The crust should appear set and with a bit of browning.You shortcrust pastry is now ready for its filling!