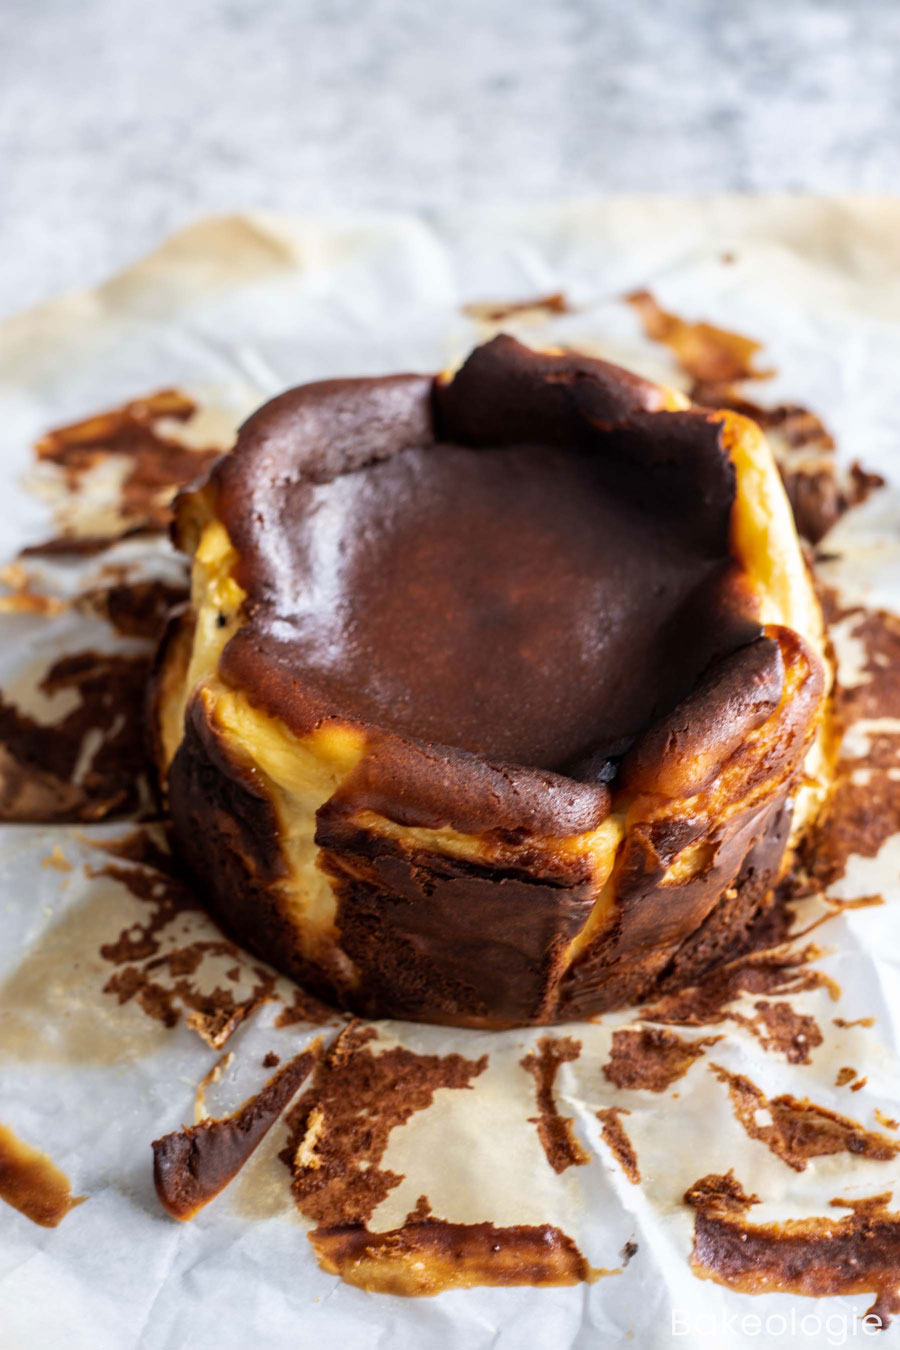
This crustless San Sebastian cheesecake is for those who don’t want the stress of making cheesecakes. It originated in the Basque region of Northern Spain (hence the name).
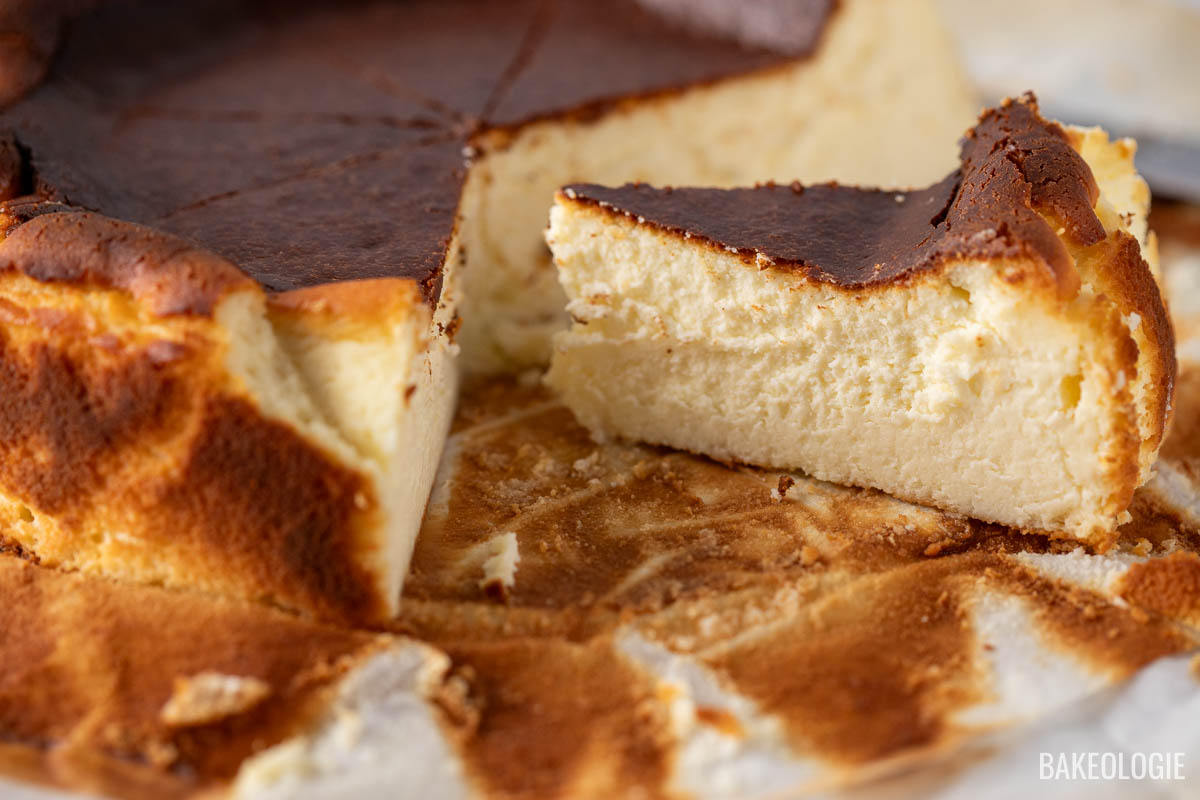
And unlike North American cheesecakes, this cheesecake is supposed to crack and have a deeply browned (“burnt”) top that has a slight caramelized flavor. It is absolutely delicious and so easy to make!
Have you been wanting to try this cheesecake but didn’t want to commit to a big size? Try this mini version first and see for yourself. 🙂

Difference between Regular Cheesecake vs. Basque Cheesecake
- In terms of looks, a Basque cheesecake is meant to look rustic – with burnt exterior and uneven sides, unlike regular cheesecakes which we sometimes stress about having a smooth, perfectly cracked-free top.
- Unlike the usual cheesecakes with a biscuit base and sometimes up to the sides, a Basque cheesecake is baked crustless in parchment paper and with burnt exterior.
- In terms of taste and texture, in contrast to a regular cheesecake which tend to be dense and firm, Basque Cheesecake is light and creamy. It’s texture is in between a souffle and a creme brûlée, which when combined with the “burnt”, caramelized exterior makes it irresistible.
Ingredients & Substitutions
Shop efficiently (treat this as your grocery list) and gather your ingredients at home without running circles in your kitchen. (i.e. One trip to the fridge to get all your dairy needs.) You can still find the full printable recipe at the end of this post.
REFRIGERATED:
- cream cheese. 750g (three 250-gram blocks). Don’t get the light or the spreadable ones. This needs to be softened and cut into pieces.
- eggs. 5 large eggs plus 1 yolk, at room temperature so it would mix well with the other ingredients.
- heavy cream. Also called whipping cream or double cream. You need 375g (1.5 cups) at room temperature. Take it out from the fridge around 30 mins before baking.
PANTRY:
- sugar. 300g or 1.5 cups of white granulated sugar
- all-purpose flour. 16g or 2 tablespoons. You can also use gluten-free flour.

Recommended Tools
Here are a few handy tools I used to make San Sebastian cheesecake. As an Amazon Associate, I may earn from qualifying purchases without a cost to you.

How to Make San Sebastian Cheesecake

STEP 1. Preheat (convention oven, no fan) oven to 400℉ / 200℃ .
Measure your ingredients and ensure that your cream cheese, eggs, and cream are at room temperature.

STEP 2. Lightly grease a 9-inch (23cm) springform pan.
Line the pan with 2 large pieces of parchment paper, overlapping the sheets so that the sides of the pan are completely covered and the paper comes above the top of the pan.
Press the parchment into the bottom edges of pan so that it extends straight up a few inches above the pan. If it extends more than 2 inches, you may cut off some of the parchment paper.

STEP 3. Using a hand mixer or stand mixer fitted with paddle attachment, beat the cream cheese on medium-high speed until fluffy and smooth. Scrape the bottom and sides of the bowl well.
Slowly add half of the sugar while mixing, pausing to scrape the bottom and sides of the bowl at least once before adding the remaining sugar and the flour.

STEP 4. Lighly whisk in the eggs and the egg yolk together in a small bowl.
While in medium-low speed, pour the eggs to the cream cheese mixture in 3 additions, stopping to scrape the bottom and sides of the bowl between each addition.

STEP 5. Keep mixing on medium-low as. your pour in the heavy cream slowly.
Your cheesecake batter at this stage should be very fluid and runny. This is what we want!

STEP 6. Pour the cheesecake batter into the prepared springform pan.

STEP 7. Bake the cheesecake for 55 minutes. It will souffle and turn a deep brown on top but still wiggles in the center when the pan is moved.
Check out my instagram video to see how to know if cheesecake is done.

STEP 8. Cool the the cheesecake in it pan on a rack for at least 2 hours before chilling overnight.
Remove the ring from the springform pan and use the parchment paper to lift the cheesecake to a serving platter. I like to leave the parchment on the cake. Push down the parchment paper on the sides to reveal more of the cheesecake.
Baker’s Notes
- San Sebastian Cheesecake needs chilling time, preferably overnight, so plan accordingly. This is a great make-ahead dessert because it’s still amazingly good even after 5 days!
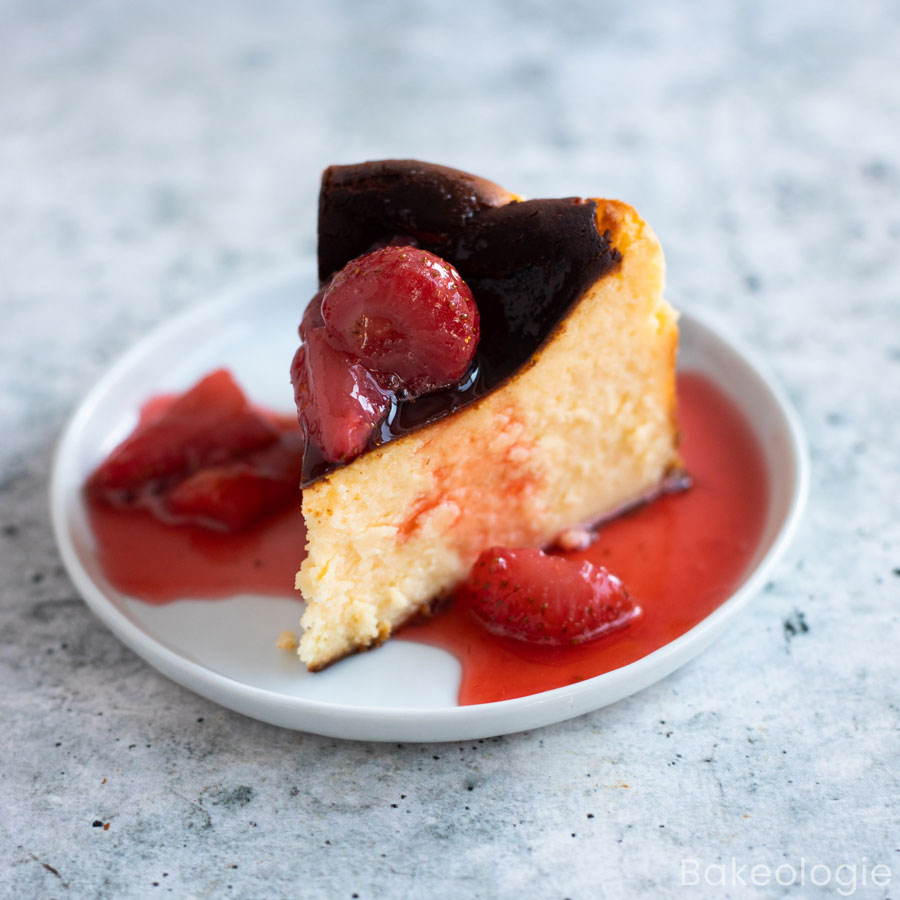
- San Sebastian cheesecake is typically served on its own, but you could serve it with fresh berries or some fruit coulis.
- To store, keep in the fridge in an airtight container or wrapped tightly in plastic film for up to 7 days.
- All recipes are developed and tested in metric grams. I have provided a conversion to US customary in the recipe but I strongly recommend using a digital scale for a more accurate result.

❤️ Tried this recipe and loved it? If you made this recipe or any other recipe on this site, please leave a ⭐️⭐️⭐️⭐️⭐️ rating + review below – or tag @thebakeologie on Instagram and hashtag it #bakeologie !
Equipment
- 9-inch Springform Pan
- Parchment Paper
- stand mixer or hand mixer
Ingredients
- 750g cream cheese blocks (3 packs of 250g cream cheese block) don't use the light version or spreadable cream cheese
- 300g (1½ cups) granulated white sugar
- 16g (2 tablespoons) all-purpose flour gluten-free flour can be used as well
- 250g (about 5 large eggs) eggs
- 30g (about 1 egg yolk from a large egg) egg yolk
- 375g (1½ cups) heavy cream/ whipping cream/ double cream
Instructions
- Mise en place. Preheat (convention oven, no fan) oven to 400℉ / 200℃ . Measure your ingredients and ensure that your cream cheese, eggs, and cream are at room temperature.
- Prep your pan. Lightly grease a 9-inch (23cm) springform pan. Line the pan with 2 large pieces of parchment paper, overlapping the sheets so that the sides of the pan are completely covered and the paper comes above the top of the pan. Press the parchment into the bottom edges of pan so that it extends straight up a few inches above the pan. If it extends more than 2 inches, you may cut off some of the parchment paper. Don’t worry about the creases in the paper.
- Beat the cream cheese. Using a hand mixer or stand mixer fitted with paddle attachment, beat the cream cheese on medium-high speed until fluffy and smooth. Scrape the bottom and sides of the bowl well. Slowly add half of the sugar while mixing, pausing to scrape the bottom and sides of the bowl at least once before adding the remaining sugar and the flour.750g cream cheese blocks300g (1½ cups) granulated white sugar16g (2 tablespoons) all-purpose flour
- Add the eggs. Lighly whisk in the eggs and the egg yolk together in a small bowl. While in medium-low speed, pour the eggs to the cream cheese mixture in 3 additions, stopping to scrape the bottom and sides of the bowl between each addition.250g (about 5 large eggs) eggs30g (about 1 egg yolk from a large egg) egg yolk
- Add the cream. Keep mixing on medium-low as. your pour in the heavy cream slowly. Your cheesecake batter at this stage should be very fluid and runny. This is what we want!375g (1½ cups) heavy cream/ whipping cream/ double cream
- Pour the cheesecake batter into the prepared springform pan.
- Bake. Bake the cheesecake for 55 minutes. It will souffle and turn a deep brown on top but still wiggles in the center when the pan is moved. Check out my instagram video to see how to know if cheesecake is done.
- Cool & Serve. Cool the the cheesecake in it pan on a rack for at least 2 hours before chilling overnight. Remove the ring from the springform pan and use the parchment paper to lift the cheesecake to a serving platter. I like to leave the parchment on the cake. Push down the parchment paper on the sides to reveal more of the cheesecake.