Search no more…this crème brûlée for two is THE perfect recipe for the timeless classic! It also happens to be the simplest to make! Rich, velvety-smooth custard with a crusty, paper-thin sheet of caramelized sugar topping. If you don’t have a kitchen torch, check out my How To Make Crème Brûlée Without Torch post.

Crème Brûlée for Two
Crème Brûlée is a classic French dessert consisting of a velvety-smooth custard base and topped with a contrasting layer of crusty, caramelized sugar.
In my opinion, the textural difference between the soft, cold custard and the warm, paper-thin crips caramel topping is what sets this dessert apart from the others!
The great news is that you don’t need to go to a fancy restaurant for the best crème brûlée experience.
Once you’ve mastered making it you’ll be making them again and again for your special occasions, like Valentine’s day, anniversaries, mother’s day, etc.
Why You Should Try This Recipe
- They are easy to make with only five basic ingredients which you probably already have in your kitchen. They make look intimidating, but it is actually easy once you understand the concepts.
- The effort to make is very minimal but makes you look like you spent hours in the kitchen.
- You can bake the custard for up to three days in advance and caramelize the top just before serving.

For Two and More…
This crème brûlée for two recipe is great for a date night at home, if you are just one or two people in the household, or maybe you just want to give it a try before committing to a bigger batch.
This is a small batch recipe but you can easily double and triple the ingredient amounts to make crème brûlée for four, six, or more people.
Best Ramekin to Use for Crème Brûlée
Crème Brûlée is best served in small and shallow individual ramekins. You can use a 4-ounce to 7-ounce ramekin. The small ramekin size ensures the custard is cooked evenly.
I love using wide and shallow ramekins so there is more surface are for the caramelized sugar, which means for every scoop I make, the ratio of the creamy custard vs the crunchy topping would be perfect.
For the photos you see here, I used a wide and shallow 7-ounce (5-inch wide, 1-inch high) ramekin. I filled about 105 grams (roughly 1/2 US cup) of custard for each ramekin.
Ingredients & Substitutions
Shop efficiently (treat this as your grocery list) and gather your ingredients at home without running circles in your kitchen. (i.e. One trip to the fridge to get all your dairy needs.) You can still find the full printable recipe at the end of this post.
DAIRY
- 160 grams heavy cream
- 2 egg yolks (around 40 grams)
- You’ll need two egg yolks from large eggs (not medium, not jumbo).
PANTRY
- 22 grams granulated white sugar + 2 tablespoons sugar for the caramelizing the tops
- You can also use turbinado sugar for caramelizing the tops
- pinch of fine sea salt
- 3/4 teaspoon vanilla bean paste
- Vanilla bean is a splurge but it gives a true, intense vanilla flavor. Vanilla bean paste is next best so you can see those vanilla bean seeds in your custard. If you don’t have access to any of these, use the best pure vanilla extract your can find.

Recommended Tools
- 2 pieces of 4-ounce (113g) to 7-ounce ramekins, preferably shallow and wide
- culinary torch
- instant read thermometer (optional)
How to Make Step-by-Step
Basically, there are three major steps in making crème brûlée:
A. Make the custard.
B. Bake the custard.
C. Caramelize the top.
Let’s go through these steps one by one!
Make the Custard

1. In a medium saucepan over medium-high heat, combine heavy cream, granulated sugar, and salt while stirring occasionally to completely dissolve the sugar.
Bring to a simmer; it does not need to fully boil. When you see bubbles begin to form around the edges remove from heat.
2. In a bowl, whisk the egg yolks and vanilla bean paste together. Slowly whisk the warm cream into the yolks until evenly colored and thoroughly combined.
3. Pour mixture through a fine-mesh strainer into a large liquid measuring cup with a spout.
4. For a smoother custard, pop any air bubbles that might have surfaced to the top, with a toothpick.
Bake the Custard

5. Divide the custard evenly into your ramekins. I used about 105g of custard per ramekin.
6. Place a paper towel on the bottom of a baking pan or sheet pan large enough to hold the two ramekins. (This keeps the ramekins from slipping.) Set the ramekins on the paper towel.
7. Carefully place the baking pan with the ramekins on the oven rack. Gently pour boiling water into the dish, taking care not to splash water into ramekins, until water reaches halfway up the side of the ramekins.
Bake until the centers of the custards are barely set and jiggles slightly when the baking pan is nudged, about 20 minutes for shallow ramekins like the ones shoen here or 30 minutes for deep ramekins.
Begin checking temperature about 5 minutes before recommended time. Over-baking can cause the custard to curdle, so take care not to leave it in the oven longer than it should.
8. Remove ramekins/dishes from the water-bath and transfer to a wire rack. Cool custards to room temperature, about 2 hours.
To take out the guesswork and a more accurate sign, I use a thermometer to know if the custards are ready. They’re done when an instant food thermometer inserted registers between 170F to 175F (77C to 80C).
Caramelize the Top
Don’t have a torch? You can still caramelize the top! All the details plus video tutorial here: How To Make Crème Brûlée Without Torch (2 Ways).

9. Cover each ramekin with plastic wrap, and refrigerate until cold, at least 4 hours or up to 3 days. The custard will continue to set as it cools, so don’t skip this part!
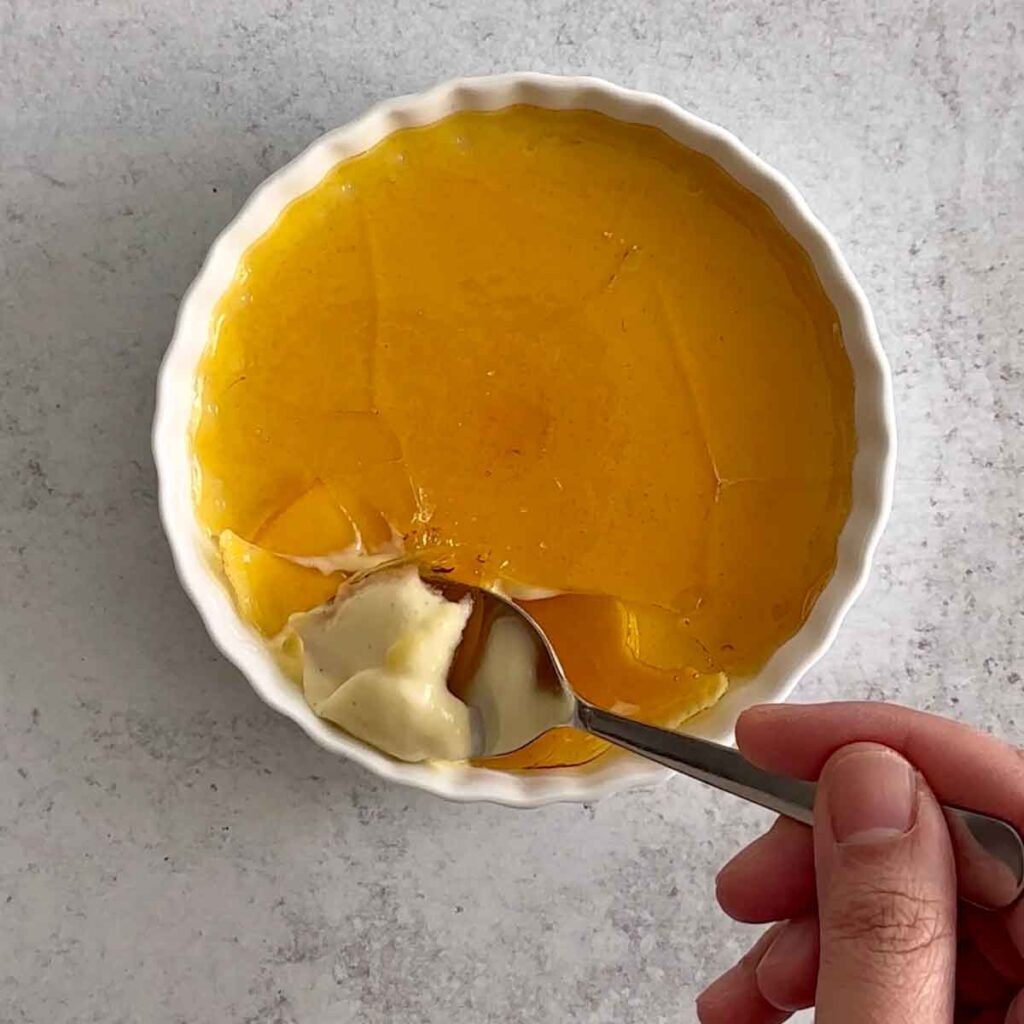
10. Just before serving, sprinkle each custard surface with about 1 tablespoon sugar, then shake and tilt the ramekin to spread the sugar in an even layer. Pour out any excess sugar and wipe away from the inside rim of the ramekin/dish.
11. Ignite torch and caramelize sugar. Sweep the flame from the perimeter of the custard toward the middle, keeping the flame about 2 inches above the ramekin. The sugar is properly caramelized when it’s bubbling and deep golden brown.
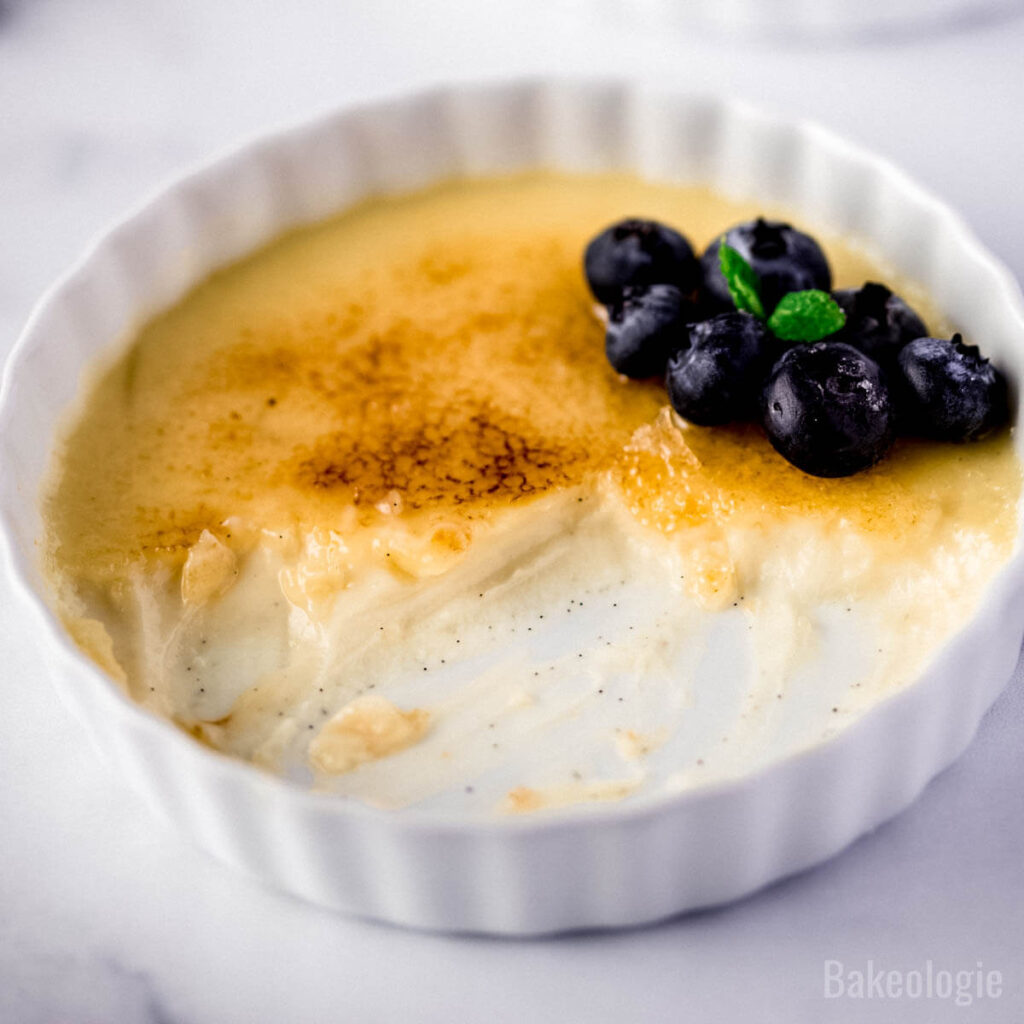
12. Garnish with some fresh berries or whipped cream if you like, then serve right away. Crème Brûlée is best eaten right after torching to get the cold custard and warm, crunchy topping experience!
Storage
Cooled and un-torched crème brûlée should be covered with a plastic cling wrap and stored in the fridge for up to three days.
You can choose to re-chill it after torching, but no longer than 30 minutes or the caramelized sugar will start to soften and eventually melt.
To get the best experience, it should be eaten right after torching. 🙂


Success Tips
- To take out the guesswork and have a more accurate sign, I use a thermometer to know if the custards are ready. They’re done when an instant food thermometer inserted registers between 170F to 175F (77C to 80C).
- If using a shallow ramekin as shown: Bake for 20 minutes or until set but still slightly loose. Gently nudge the pan. The custard should slightly jiggle but you should be able to very lightly touch the top of the custard without getting any on your finger. Keep in mind all ovens vary. The custards will firm up as they cool.
- If using a deeper ramekin: You’ll need a deeper pan such as a cake pan instead of the rimmed baking sheet as shown. Bake for 30 to 35 minutes or until set but still slightly loose. Again, the custard should jiggle slightly.
Can You Make Crème Brûlée Without a Torch?
Yes. Here’s a dedicated article on how to make crème brûlée withouth a torch!
I have say though that the paper-thin, caramelized crust only a culinary torch can create makes a difference.
While a kitchen torch seems like a splurge, it can be used for many other tasks like, toasting and melting marshmallows for s’mores, toasting the meringue on your pie, adding char to your roasted tomatoes or peppers, melting cheese atop a dish .

FAQs
Can you make this a day ahead?
You actually have to plan ahead a bit to make this as it needs time to cool in the fridge after baking. This makes the perfect dessert for entertaining, because it can be made up to three days ahead of time.
Note though that the caramelizing part (torching) should be done just before serving.
Why do you bake Creme Brulee in a water bath?
Also referred to as a bain-Maire, the hot water distributes the heat evenly through the egg custard.
If you were to put the ramekin dishes into the oven as they are, the custard can split and may turn grainy.
Do you serve crème brûlée warm or cold?
Crème Brûlée is usually served cold, with a warm top.
After baking, it is kept in the fridge for at least 4 hours to let the custard set. The just before serving, sugar is sprinkled on top then caramelized with a torch. That makes the top warm, while the main base cold.
For me, the contrasting textures is what makes this dessert vary appealing and enjoyable to eat!
Do you refrigerate crème brûlée after torching?
Once torched, it is best enjoyed right away.
But if you must refrigerate after torching, do it for no more than 30 minutes. As it cools in the fridge, the caramelized sugar starts to lose its crisp topping and eventually melt.
Should crème brûlée be jiggly out of the oven?
The custard should jiggle a little when nudged. It should still be quite wobble, the centre barely set and not liquid-y.
The custard will continue to firm up as it cools in the fridge.
Watch How To Make It

Equipment
- ramekins (4-ounce to 7-ounce)
- culinary torch
- instant read thermomoter
Ingredients
- 160 grams (3/4 cup) heavy cream
- 24 grams (2 tablespoons) white granulated sugar
- pinch fine sea salt
- 2 egg yolks from large eggs (about 40 grams)
- ¾ teaspoon vanilla bean paste
For the caramelized topping
- 2 tablespoons white granulated sugar
Video
Instructions
Make the custard
- PREP. Adjust oven rack to middle position and heat the oven to 300F/ 150C. Bring a kettle of water to a boil for the water bath and set aside until needed.
- MAKE THE EGG YOLK MIXTURE. Whisk the egg yolks and vanilla bean paste together. Set aside.2 egg yolks from large eggs3/4 teaspoon vanilla bean paste
- SIMMER THE CREAM MIXTURE. In a medium saucepan, combine heavy cream, granulated sugar, and salt while stirring occasionally to completely dissolve the sugar. As soon as it begins to simmer, remove from heat.160 grams (3/4 cup) heavy cream24 grams (2 tablespoons) white granulated sugarpinch fine sea salt
- TEMPER THE EGGS. Slowly add in about 1/4 cup of the cream mixture, while constantly whisking, into the yolks until evenly colored and thoroughly combined. Then in a slow and steady stream, pour and whisk the remaining cream mixture. Keep those egg yolks moving so they don’t scramble.
- STRAIN. Pour mixture through a fine-mesh strainer into a large liquid measuring cup with a spout or a pitcher or medium bowl; discard solids in the strainer. Pour (about 105g of custard per ramekin) or ladle mixture evenly into the ramekins. Pop any air bubbles that might have surfaced to the top, with a toothpick.
- WATER BATH. Place a paper towel on the bottom of a baking pan or sheet pan large enough to hold the two ramekins. (This keeps the ramekins from slipping.) Set the ramekins on the paper towel. Carefully place the baking pan with the ramekins on the oven rack. Gently pour boiling water into the dish, taking care not to splash water into ramekins, until water reaches halfway up the side of the ramekins.
- BAKE. Bake until the centers of the custards are barely set and jiggles slightly when the baking pan is nudged, about 20 minutes for shallow ramekins like the ones pictured above or 30 minutes for deep ramekins. For a more accurate sign, they're done when an instant food thermometer inserted registers between 170F to 175F (77C to 80C), Begin checking temperature about 5 minutes before recommended time. Over-baking can cause the custard to curdle, so take care not to leave it in the oven longer than it should.
- COOL. Remove ramekins/dishes from the water-bath and transfer to a wire rack. Since my ramekins are thin, I used two tongs to remove them (watch the video to see this). Cool custards to room temperature, about 2 hours. Cover each ramekin with plastic wrap, and refrigerate until cold, at least 4 hours or up to 3 days.
- CARAMELIZE THE TOPS. Sprinkle each custard surface with about 1 tablespoon sugar; then shake and tilt the ramekin to spread the sugar in an even layer. Pour out any excess sugar and wipe away from the inside rim of the ramekin/dish. Ignite torch and caramelize sugar. Sweep the flame from the perimeter of the custard toward the middle, keeping the flame about 2 inches above the ramekin. The sugar is properly caramelized when it's bubbling and deep golden brown.2 tablespoons white granulated sugar
- SERVE right away. Refrigerate ramekins, uncovered, to re-chill, no longer than 30 minutes or the caramelized sugar will start melting.