Lunchbox cakes – miniature size cakes paired with a smooth, creamy, and not-so-sweet frosting, packed in the cutest way possible. Versatile, adorable, and fun!
Your Complete Guide To Lunchbox Cakes
Lunchbox cakes are miniaturized versions of regular full-size cakes, which means you can decorate them just like the usual big cakes.
Because their sizes are typically small, lunchbox cakes are easier to make, decorate, handle, store, pack, and transport. Win win in many scenarios!
As pretty as they are delicious, these mini versions are perfect for any occasion – from a casual picnic to a special celebration.
With this simple recipe for a vanilla sheet cake and a smooth, silky, not-so-sweet buttercream you’ll be able to confidently prepare this at home.
Brief Origin of Korean Lunchbox Cake
This petite, two-by-four inch cake known as a bento or Japanese lunchbox cake is both beautiful and minimalist.
Weighing in at only 300 to 360 grams, these cakes first appeared in Korea but have gained popularity across the globe.
In fact, its origin can be traced all the way back to the Kamakura period of 12th century Japan when people would cook and dry rice to take with them to work. To serve this purpose, 16th century lacquered wooden lunchboxes were created.
In the early 1900s, schoolchildren began to use them as well. It’s an interesting fact that just soon after, they started being banned in schools because it was considered a reflection of a student’s family wealth over other students. This practice stopped when meals were served in schools instead.
However, in the 1980s, these lunchboxes experienced a resurgence in supermarkets.
In Japan, bento lunchboxes begun to be carried at home. They are not only nutritious but also beautiful.
From Japan, the concept of lunch packing spread to countries such as Taiwan, China, and South Korea. That is when Korean lunchbox cakes first emerged in South Korea as ‘cake on the go’ or ‘no-share cake,’ becoming an instant hit.
Nowadays these cakes are popular to make and give for just about any event, milestone, and occasion – 100 day anniversary, birthday, thank you, get well soon, etc.
Uses And Ideas
Gifts for events and milestones
With their portability and comparatively small size, these lunchbox cakes make the perfect gifts for any event or milestone you have coming up. Get-well soon cake, thank you cakes, anniversaries, promotions, Christmas, and weddings – your guests will be impressed with how personalized and tasty these treats are.
K-pop fans have also made them a worldwide phenomenon by using them to commemorate special occasions with this dessert.
A great starting point for new bakers
If you’re new to cake making and decorating, a lunch box cake is a great way to practice without wasting a lot of ingredients. These cakes are smaller and easier to handle, so you can get the hang of layering and decorating without ruining an entire cake.
Plus, it’s a lot less expensive to practice with a lunch box cake than it is to practice with a full-size birthday cake. So if you’re looking to improve your baking skills, a lunch box cake is the perfect place to start.
Cake smash
A cake smash is a popular way to celebrate a first birthday. However, cake smashes can be expensive, especially if you opt for a custom cake. A lunchbox cake is a great alternative that won’t break the bank.
You can customize it just like a custom cake, but you don’t have to worry about spending a lot of money. You can also have a few as backups in case of any accidents.

Small parties and gatherings
With small gatherings becoming the norm, more and more people are looking for smaller cakes that are easier to serve and enjoy.
These little beauties are the perfect size for a few people, and they pack a lot of flavor into a small package. Plus, they can be served alongside a dessert table for added variety.
Party favors that are both unique and fancy
These individually-sized cakes are excellent for parties and showers, They are a great way to show your guests how much you appreciate their attendance.
Perfect for kids
Why not let your kids layer, pipe, and decorate a mini cake fully loaded with their heart’s desire? It’s a great opportunity for quality family time.
Result: A messy work of art that’s not only delicious to eat but also proudly displayed on the fridge for all to see!

Size of Lunchbox Cakes
Lunchbox cakes can be any size you like, but they are typically small – about 3 to 4 inches wide and tall. This makes them perfect for individual servings or as gifts.
I used a 4-inch cookie cutter. You can do 3.5 or 4.5 inch but note that this may affect the yield of this recipe. A 4-inch diameter cutout makes 6 lunchbox cakes.
If you don’t have a cookie cutter, another option is to use any round shape object as a template, like a bowl or a small plate. Put that over your cake and use a knife to cut around it.
The 9×13 Vanilla Cake
The vanilla cake is based on my popular fluffy and buttery vanilla cake recipe. I adjusted the amounts to bake it into the classic 9×13 cake pan.
It is moist, fluffy and packed with buttery and vanilla flavor – tastes homemade and so much better than the artificial-vanilla boxed variety. It is also very versatile you can use it to pair with many different flavors.
If you haven’t tried this vanilla cake yet, you may want to check out the reviews here!
Straight out of the pan, the height of the cake is about 3.5 cm ( approx 1.25 inches) so your baking pan should be at least 2 inches high. The advantage of baking the cake in this size is that you can cut out any shape you like (hearts, squares, 3-inch circles).
Have you tried this cake and want a chocolate version? If so, let me know in the comments below!

The Not-So-Sweet Buttercream That Should Be In Every Baker’s Back Pocket
For lunchbox cakes, the most popular frosting choices are either vanilla buttercream or stabilized whipped cream but you can use any frosting you like. American Buttercream, Swiss Meringue Buttercream, Chocolate buttercream, Cream Cheese Buttercream – the choice is yours.
For this specific recipe, I chose to use my “faux” Swiss Meringue buttercream because it is not toothachingly sweet and is totally breeze to make – only takes 10 minutes.
It’s as smooth and silky as the real Swiss Meringue buttercream but as easy as the American buttercream to make. Hence the name “Faux” Swiss Meringue Buttercream.
I used this buttercream to make my eldest child’s birthday cake when I just had a newborn baby. It is that easy, fast, and convenient to make. I promise anyone can make this buttercream!
If you’re not familiar with the real Swiss Meringue buttercream, it involves separating the eggs whites and cooking them at a specific temperature which may be tedious to do.
On the other hand, American buttercreams are just easy to make – basically you just mix all the ingredients together but they are extremely sweet due to the amount of powdered sugar it needs to stiffen the buttercream.
“Faux” Swiss Meringue Buttercream is a great basic recipe to keep in your back pocket as you can use this in many baked goods.
What You Need To Make These Lunchbox Cakes
1. The Vanilla Sheet Cake (9×13)
Here are the ingredients you need for the vanilla sheet cake:
- Flour – Just plain/ all-purpose flour.
- Baking powder – The rising agent in this cake.
Note that baking powder does expire so make sure yours is still good.
- Salt – Regular table salt. Salt brings out the other flavours.
- Butter – Use unsalted and it should be at room temperature.
- Sugar – Superfine/ caster sugar is preferred but regular white granulated sugar works well too.
Here’s a post on how to make your own superfine sugar in less than 5 mins .
- Vanilla – Use pure vanilla extract and not the artificial ones.
- Eggs – You need four large eggs at room temperature.
- Milk – Always use full-fat/ homogenized milk for a rich mouth feel. I have not tried any substitute for this.
And here are the tools you need for the vanilla sheet cake:
- 9×13 cake pan
- parchment paper
- stand mixer with paddle attachment or hand mixer
- flour sifter or any fine mesh strainer
- mixing bowls, rubber spatula, whisk
2. The Easiest Not-So-Sweet Frosting
Here are the ingredients for the easiest not-so-sweet frosting:
- Pasteurized egg whites – Use pure pasteurized egg whites. Unlike raw egg whites, pasteurized ones are safe to consume because they go through a heat treatment process similar to milk. You can find them packaged in cartons next to other eggs at the grocery store.
- Powdered Sugar – Also known as confectioner’s sugar or icing sugar. Note that powdered sugar is not the same with superfine sugar, and they are not interchangeable.
- Salt – Just regular table salt.
- Butter – Only use unsalted butter, and make sure it’s softened to room temperature.
- Vanilla – Pure vanilla extract, not the artificial ones. Use vanilla bean paste if you like seeing vanilla seed specks in your buttercream.
- Food coloring (optional) – Use gel food coloring. The final buttercream is white in color. You can divide the buttercream in separate bowls and use a different food color for each bowl.
And here are the tools you need to make the faux Swiss meringue buttercream
- stand mixer with whisk attachment or hand mixer
- rubber spatula
3. The decorations (optional)
There are several ways to decorate your cake:
- If just using buttercream, you would need some piping bags and piping tips.
- Sprinkles, chocolate shavings, and even candies are great options too.

How To Make Step-by-Step
There’s a few parts to this cake (vanilla cake, buttercream, assembling, and decorating), but I promise it is quite straightforward. Remember, it’s a rustic cake, so relax. We aren’t seeking perfect layers here!
1. Make the vanilla cake
Step 1: Dry ingredients – Sift the flour, baking powder, and salt into a medium bowl and mix them together using a whisk. Set aside,
Step 2: Cream butter & sugar – In the bowl of a stand mixer fitted with the paddle attachment, beat the butter, sugar, and vanilla on medium speed until light and fluffy, about 8 minutes.
Step 3: Add the eggs – two at a time until each addition is incorporated before adding the next.
It is always a good practice to scrape down the sides and bottom of the bowl with a spatula to ensure that all ingredients are combined well.
Step 4: Add wet and dry ingredients – Add the flour mixture you’ve made earlier in four parts, alternating with the milk in three parts. Beat just until each flour addition is incorporated before adding the next.
This stage is where people tend to overmix, which would then result to a dense cake.
Step 5: Pour into a lined 9×13 baking pan and smooth the surface using your spatula (an offset spatula is the best). Make it as flat and even as you can.
Step 6: Bake for 40 minutes at 350°F / 180°C (320°F / 160°C if using fan-assisted oven or convection oven).
All ovens are different so remember to check your cake earlier than the suggested baking time. I highly recommend you to use an oven thermometer. You might be surprise how off your oven temperature is.
The cake is ready when the top is a little golden brown (refer to photo) and when a toothpick inserted comes out clean or with few small crumbs.
Step 7: Cool – Remove the cake from the oven and put over the cooling rack. When the cake has fully cooled down, refrigerate it (still in the pan) for about one hour, while you make the frosting the prep for your decorations. It is easier to cut the cake into small circles if they are cold.

2. Make the “faux” Swiss meringue buttercream
Step 1: Dry Ingredients – In a bowl of a stand mixer fitted with whisk attachment, combine the pasteurized egg whites, powdered sugar, and salt. Mix everything together on low speed (or you’ll have sugar dust everywhere!) until well combined. Turn off the mixer then scrape down the sides and bottom of the bowl. Set the mixer to medium high speed and continue to beat for another 5 minutes.
Step 2: Add butter and vanilla– Turn the speed to medium-low then start adding the butter in chunks, about 1-2 tablespoons at a time. When all the butter has been incorporated, add the vanilla extract. The buttercream will not look smooth YET at this stage.
Step 3: Whip the buttercream – Stop the mixer and scrape the sides and bottom of the bowl again. Set the mixer speed to medium and beat the mixture for another 10 to 12 minutes, until you have a smooth and creamy buttercream.
Step 4: Add Color (optional) – If you are going to color your buttercream, add your drop(s) of food color then whip on high until the color is evenly incorporated.
Step 5: Smoothen (optional but highly recommended) – Switch to paddle attachment and mix on low speed for 15-20 minutes. This will remove air bubbles and will make your buttercream really smooth. If you want a super creamy frosting, this is the trick!
3. Assemble and decorate the cake
Using the 4-inch cookie cutter, cut out 6 cake circles from the 9×13 vanilla cake.

We will then level and torte each mini round cake. To torte means to divide the cake horizontally so we can get 2 layers per cake.
To learn how to level and torte cakes, here are helpful resources:
How to Level and Torte a Cake without a Leveler
Put the layers on a parchment paper. Spread an even layer of buttercream on top of the cake layer with an offset spatula.

Stack the next cake layer on top and cover the cake with a thin layer of buttercream. Smooth the frosting using a bench scraper and/or small offset spatula.
I did not use a cake stand for for this as the cake is small, but you can definitely use one if that’s gonna make things easier for you.
Chill the cake again in the fridge (20 minutes) or the freezer (10 minutes) until the buttercream is firm to the touch.

Frost/ cover the cake with a thicker layer of buttercream and smooth using a small offset spatula or a bench scraper.
Chill the cake again in the fridge (20 minutes) or the freezer (10 minutes) until the buttercream is firm to touch. This will make it much easier to decorate the cake and move to its box.

Decorate as desired – I divided my buttercream into 4 bowls and added a different food color to each of the 3 bowls.
Use different kinds of piping tips, sprinkles, chocolate shavings, candies, or even fresh fruit to prettify you cake. Get creative and have fun!
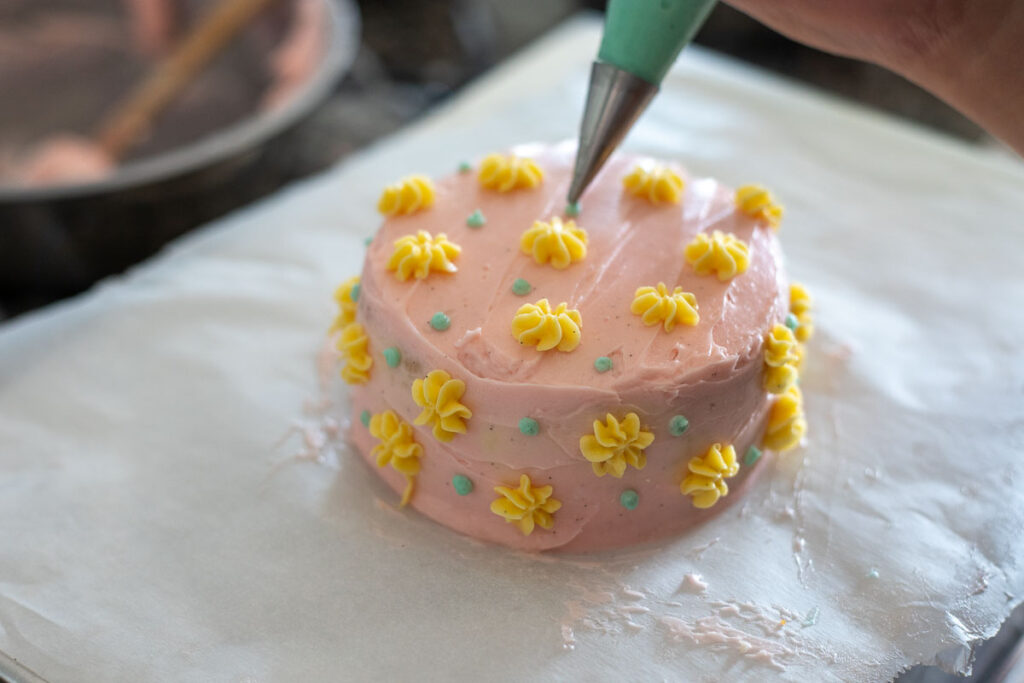
Voilà! Here’s your rustic yet fabulous masterpiece!

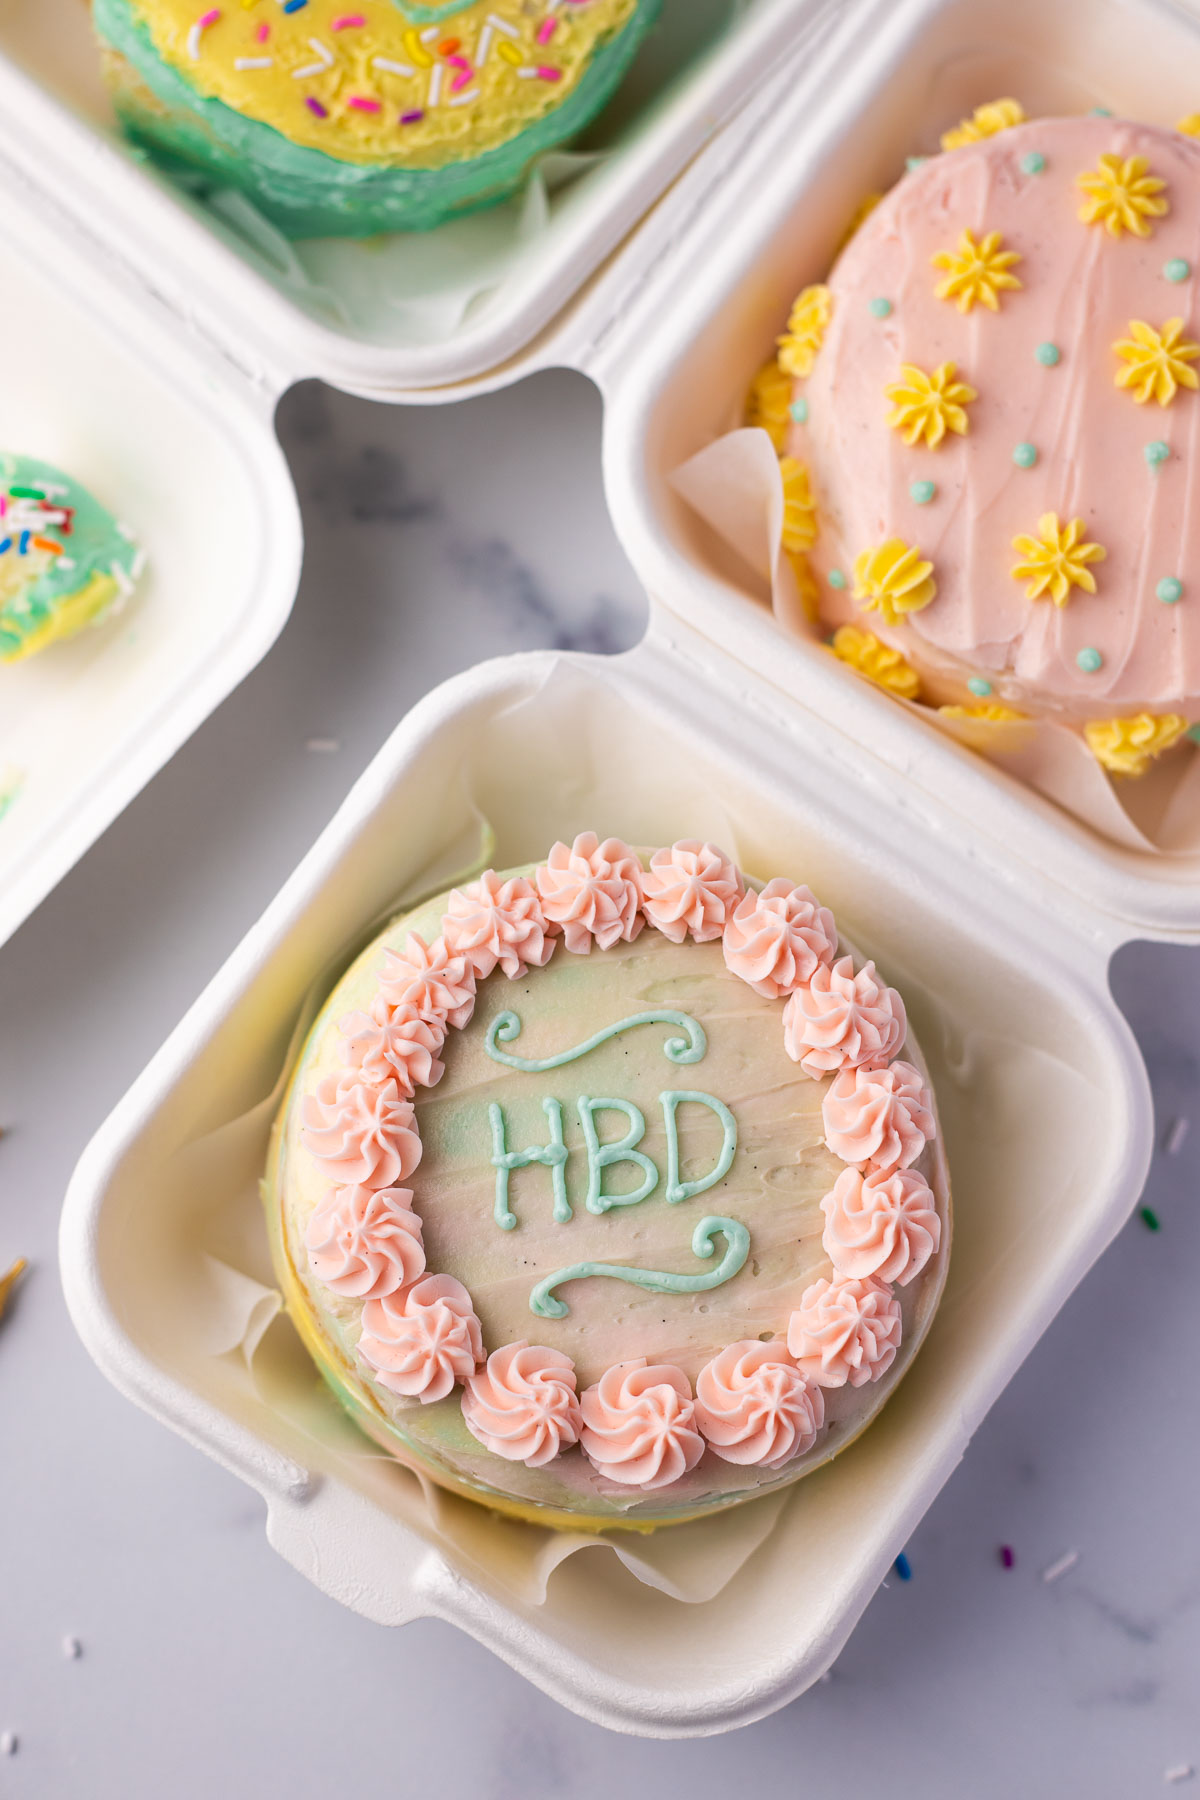
Packaging Tips
- The allure of these lunch box cakes is increased by the way they are packaged.
- Your dessert will snugly fit into a burger box or clamshell takeout container lined with parchment paper, whether it’s in the classic circular shape or heart-shaped. The contrast of the plain packaging with the elaborate decorations on the cake adds charm to the appeal.
- You can find burger boxes and clamshell containers in most restaurant supply stores or online.
- To make sure your cake will fit, measure the width and height of the box or container you’re using. The cake should be slightly smaller than the container so it fits snugly inside.
- Another thing to keep in mind is that the cakes will be slightly larger once the frosting and decorations are added. This typically increases the cake’s circumference by 1/2 to 3/4 inch, and it grows taller by 1/4 to 3/4 inch depending on how thick the layer of frosting is and what types of decorations you choose. Make sure you take this into account when cutting out your cake layers or purchasing containers ahead of time.
- Make your mini layer cakes look even more appetizing and giftable by tying up the boxes with some colorful ribbon or twine.
- I like adding a small birthday candle or a dessert fork at the top inside container using washi tape for extra cuteness. It’s a nice touch and it’s useful too!


Storage
A frosted cake will stay scrumptious in the fridge for a whole week. The buttercream frosting creates a barrier, sealing in all of the moisture to keep the cake moist and delicious.
If you cut into the cake and have any leftovers, cover the sliced portion with parchment paper or any remaining frosting to keep it moist. This will prevent the exposed part of the cake from drying.
FAQs
Can I make this in advance?
Yes, You can bake the vanilla cake up to 7 days in advance and freeze them (tightly wrapped in cling film and stored inside a freezer bag to avoid freezer burn). Defrost the cake before applying buttercream on them.
You can also make vanilla buttercream ahead and freeze it. To know more about this in depth this you can visit the Faux Swiss Meringue Buttercream page.
Can I freeze the frosted cake?
Yes, you can freeze the frosted cake.
To defrost, transfer it to the fridge overnight then bring to room temperature the following day. Minimizing the temperature shock helps prevent condensation.
❤️ Tried this recipe and loved it? If you made this recipe or any other recipe on this site, please leave a ⭐️⭐️⭐️⭐️⭐️ rating + review below – or tag @thebakeologie on Instagram and hashtag it #bakeologie !
Ingredients
For 9×13 Vanilla Sheet Cake:
- 375 grams all-purpose flour
- 2 ½ teaspoon baking powder
- ½ teaspoon fine salt
- 227 grams unsalted butter
- 300 grams white granulated sugar
- 1 teaspoon pure vanilla extract
- 200 grams eggs (without shell) (about 4 large eggs)
- 240 grams full fat milk
For Simple Faux Swiss Meringue Buttercream:
- 180 grams pasteurized egg whites (see note)
- 680 grams powdered sugar
- ½ teaspoon fine salt
- 680 grams unsalted butter at room temperature
- 2 tablespoon pure vanilla extract
Instructions
Prep
- Preheat oven to 350°F / 180°C (320°F / 160°C if using fan-assisted oven or convection oven).
- Line the bottom of 9×13 cake pan with parchment paper.
Make the 9×13 vanilla cake
- Dry ingredients – Sift the flour, baking powder, and salt into a medium bowl and mix them together using a whisk. Set aside375 grams all-purpose flour2 ½ teaspoon baking powder½ teaspoon fine salt
- Cream butter & sugar – In the bowl of a stand mixer fitted with the paddle attachment, beat the butter, sugar, and vanilla on medium speed until light and fluffy, about 8 minutes.227 grams unsalted butter300 grams white granulated sugar1 teaspoon pure vanilla extract
- Add the eggs – two at a time until each addition is incorporated before adding the next. It is always a good practice to scrape down the sides and bottom of the bowl with a spatula to ensure that all ingredients are combined well.200 grams eggs (without shell)
- Add wet and dry ingredients – Add the flour mixture you’ve made earlier in four parts, alternating with the milk in three parts. Beat just until each flour addition is incorporated before adding the next.240 grams full fat milk
- Pour into a lined 9×13 baking pan and smooth the surface using your spatula (an offset spatula is the best). Make it as flat and even as you can.
- Bake for 38-40 minutes at 350°F / 180°C (320°F / 160°C if using fan-assisted oven or convection oven). The cake is ready when the top is a little golden brown (refer to photo) and when a toothpick inserted comes out clean or with few small crumbs. The most accurate way to check is thru a food thermometer. The internal temp should be between 200-210 F (93–99°C).
- Cool – Remove the cake from the oven and put over the cooling rack. When the cake has fully cooled down, refrigerate it (still in the pan) for about one hour.
Make the faux Swiss meringue buttercream
- Dry Ingredients – In a bowl of a stand mixer fitted with whisk attachment, combine the pasteurized egg whites, powdered sugar, and salt. Mix everything together on low speed until well combined. Turn off the mixer off then scrape down the sides and bottom of the bowl. Set the mixer to medium high speed and continue to beat for another 5 minutes.180 grams pasteurized egg whites680 grams powdered sugar1/2 teaspoon fine salt
- Add butter and vanilla – Turn the speed to medium-low then start adding the butter in chunks, about 1-2 tablespoons at a time. When all the butter has been incorporated, add the vanilla extract. The buttercream will not look smooth YET at this stage.680 grams unsalted butter2 tablespoon pure vanilla extract
- Whip the buttercream – Stop the mixer and scrape the sides and bottom of the bowl again. Set the mixer speed to medium and beat the mixture for another 10 to 12 minutes, until you have a smooth and creamy buttercream.
- Add Color (optional) – If you are going to color your buttercream, add your drop(s) of food color then whip on high until the color is evenly incorporated.
- Smoothen (optional) – Switch to paddle attachment and mix on low speed for 15-20 minutes. This will remove air bubbles and will make your buttercream really smooth. If you want a super creamy frosting, this is the trick!
Assemble the cake
- Using the 4-inch cookie cutter, cut out 6 little cake circles from the 9×13 vanilla cake.
- Level and torte each mini round cake. To torte means to divide the cake horizontally so we can get 2 layers per cake.
- Put the layers on a parchment paper. Spread an even layer of buttercream on top of the cake layer with an offset spatula.
- Stack the next cake layer on top and cover the cake with a thin layer of buttercream. Smooth the frosting using a bench scraper and/or small offset spatula.Chill the cake again in the fridge (20 minutes) or the freezer (10 minutes) until the buttercream is firm to the touch.
- Cover the cake with a thicker layer of buttercream and smooth using a small offset spatula or a bench scraper.Chill the cake again in the fridge (20 minutes) or the freezer (10 minutes) until the buttercream is firm to touch. This will make it much easier to decorate the cake and move to its box.
- Decorate as you like! Pipe some buttercream, use sprinkles, chocolate shavings, candies, or even fresh fruit to prettify you cake. Get creative and have fun!


made one for my dad’s birthday today. it was a long process but I had a lot of fun and he loved it! would definitely make this again!!!!
Yay! I appreciate you for taking the time to share your experience. 😉
is there a substitute for the pasteurized egg white?
I haven’t tried any substitutions for pasteurized egg whites yet, sorry! If you can’t find them, may I suggest the classic Swiss Meringue buttercream? It cooks the egg whites so it would be safe for consumption.
Just made them with some sprinkles and they came out perfectly!
Hooray! =)