PREP TIME: 45 minutes | BAKING TIME: 12 minutes | YIELD: 22 cookies
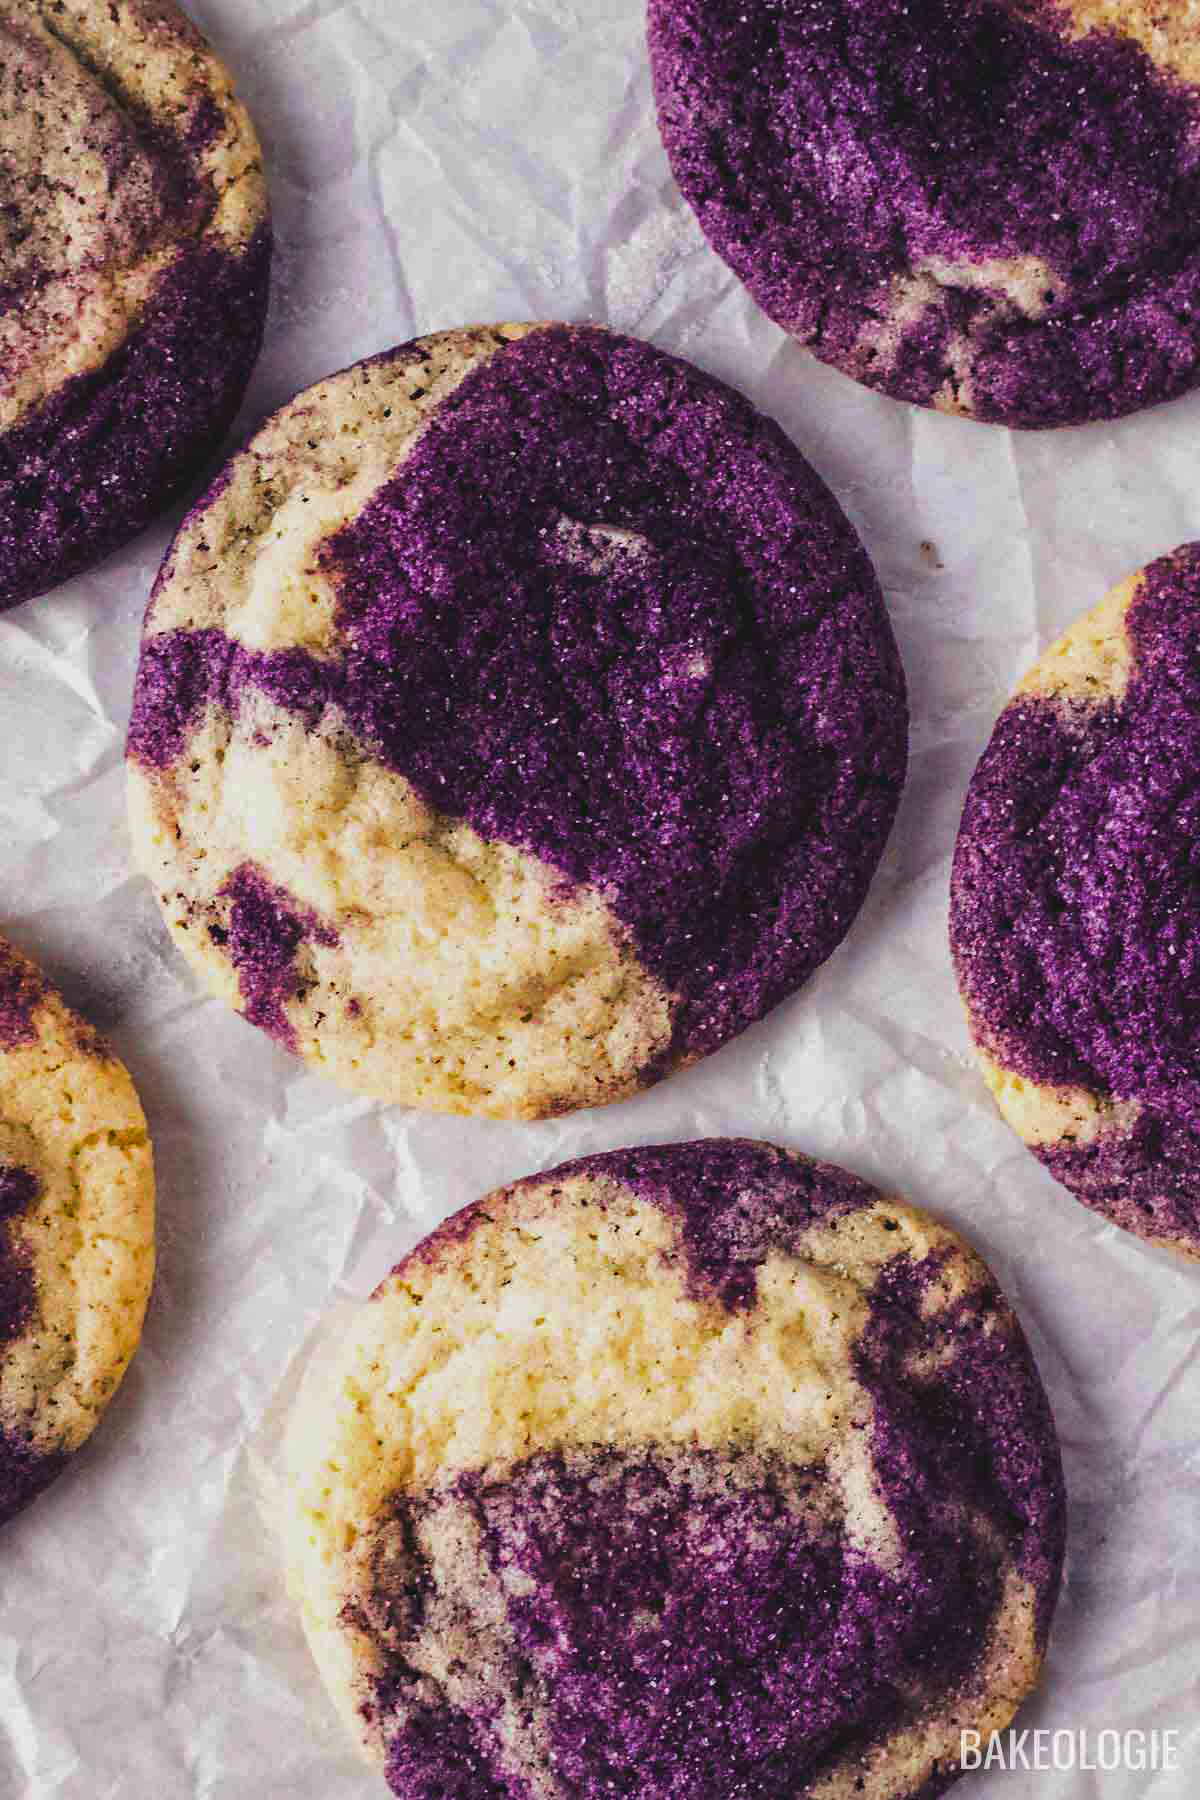
Swirls of red, white, and green make these old-fashioned holiday pinwheel cookies a Christmas favorite. Made with rich butter and dreamy vanilla, the dough can be made ahead and kept frozen until you are ready to slice and bake.
Making these cookies entail quite a number of steps but don’t fret as they are easy and the recipe is very forgiving.

Versatile recipe for ANY holiday
Pictured here are swirls in red, green, and white colors which are obviously for Christmas, but you can easily change up the colors depending on the holiday. Like, use pastel food colors for Easter or orange and purple for Halloween.
Totally optional, I rolled the rolled cookie dough in gold sanding sugar. It just adds texture and color. I imagine Christmas or Easter-themed sprinkles would make these even cuter!

Colors and Flavors
Vanilla-flavored holiday pinwheel cookies are the favorite in our house, but you can make them in many different flavors by adding flavor extracts.
You can adapt the recipe by swapping out the food coloring and the flavoring extract with anything you like. Lemon extract with yellow food coloring, raspberry extract paired with pink food color, mint with green, etc.
The sky’s the limit with these cookies!

Here’s What You’ll Need
Shop efficiently (treat this as your grocery list) and gather your ingredients at home without running circles in your kitchen. (i.e. One trip to the fridge to get all your dairy needs.) You can still find the full printable recipe at the end of this post.
Ingredient Shopping List
DAIRY:
- 113 grams unsaltedbutter
- at room temperature
- 50 grams (without shell) or 1 large egg
- For the egg to mix well with the other ingredients, it has to be at room temperature. If you forgot to take your eggs out of the fridge earlier, place your eggs in a bowl of warm water for about 10 minutes
PANTRY:
- 180 grams all-purpose flour plus extra for dusting your work surface and rolling pin
- 1/2 teaspoon baking powder
- 1/4 teaspoon fine salt
- 125 grams granulated sugar
- 1/2 teaspoon pure vanilla extract
- food coloring of your choice – red and green for this Christmas pinwheel cookies
- The amount of food coloring you will add depend on the type you use and how saturated you want the colors.
- Typically, gel food colors are stronger so you would use lesser amount compared to liquid food coloring.
- your choice of sanding sugar or sprinkles (optional).

Tools & Equipment
- fine mesh strainer/ flour sifter
- whisk
- stand mixer with paddle attachment or hand mixer (A hand mixer would work well, too!)
- plastic cling wrap
- rolling pin
- a ruler would be handy, but you can estimate if you don’t have one
- half sheet pan (17.75 x 12.75 x 1 inches) or a cookie sheet
How To Make Holiday Pinwheel Cookies Step-by-Step
Do some prep:
Before you start, ensure your butter and eggs are at room temperature. Otherwise, you will get a lumpy batter and your cookie dough won’t be smooth.
Sift the flour, baking powder, and fine salt into a bowl.
Make the cookie dough:
In the bowl of a stand mixer fitted with paddle attachment, combine room temperature butter and granulated sugar. Beat on medium speed for about 3 minutes, until light and creamy.
Add the egg and vanilla, then beat until combined. Scrape the sides and bottom of the bowl to make sure everything is combined.
(NOTE: If you’re doubling the recipe, add the egg one at a time, beating after each addition until incorporated).
Turn mixer to low speed. Add the flour mixture and beat until just incorporated. Do not overmix!


Divide and chill:
Scrape the dough into a lightly floured work surface and divide into three equal portions. I like to use a digital kitchen scale here to make sure the dough portions are of equal size.
Using your hands, shape one portion into an even 5 x 3-inch rectangle. Wrap the rectangle in plastic wrap.
Return one of the remaining dough portions to the mixer bowl, add the red food coloring, and mix the dough on low speed until evenly colored. Dust the work surface with fresh flour, scrape the red dough out onto it, and then shape the dough into an even 5 x 3-inch rectangle. Again, wrap this red rectangle in plastic wrap.
Wash and dry the mixer bowl and paddle, then repeat with the remaining portion of dough, add green food coloring and shape the dough into a rectangle. Wrap this green rectangle in plastic wrap.
Refrigerate all the dough for at least 30 minutes.


Roll the dough:
If using sanding sugar, spoon the coarse sugar onto a large, flat plate or baking tray, creating a thin, even layer.
Dust some flour to your rolling pin to avoid the dough sticking. On a lightly floured work surface, roll out each dough rectangle into a rectangle about 10 x 7 inches.
Starting with the white dough as the base, stack the rectangles on top of one another. Run the rolling pin over the stack a few times to ensure that everything is even and to also to compress the three doughs together. The stack should roll out a few inches larger.
Using a sharp knife, trim off a very small amount on all sides to create a perfect rectangle. Starting from the long side, roll up the stack tightly to create a log.
Roll the log in the sanding sugar, coating it evenly, then wrap the log tightly in plastic wrap and refrigerate for at least 4 hours or up to overnight. You can turn the wrapped log a few times to prevent it from developing a flat side.


Slice and bake:
Position oven rack in the middle of the oven and preheat to 350 F / 175 C.
Line your baking sheet with parchment paper.
Remove the plastic wrap from the log. Using a sharp knife, cut the log into 1/4-inch thick slices. Arrange 15 slices on the baking sheet, spacing them evenly.
Hold the remaining slices in the fridge until they are ready to bake.


Bake the cookies for 10-12 minutes. As not all ovens are the same, watch for visual cues to know when your cookies are done. They should be a little puffed and set to the touch.
I use an oven thermometer, so at 350F, my cookie came out perfect at exactly 12 minutes.
PRO TIP: I highly urge you to use an oven thermometer too. As surprising as it may be, different ovens set to the same temperature can vary as much as 20 degrees F!
Watch these cookies bake in the oven
Watch these holiday pinwheel cookies baking in the oven. Isn’t it so satisfying?!

Cool:
Transfer the baking sheet to a wire rack and let cool for 5 minutes, then carefully transfer the cookies to a wire rack to cool completely before serving.


Pro Tips For Making These Holiday Pinwheel Cookies
- Make sure your eggs are at room temperature so they will mix evenly in the batter. If you forgot to take your eggs out of the fridge earlier, place your eggs in a bowl of warm water for a few minutes; this will bring them to room temperature.
- I found that if I’m using a 5-quart mixer bowl, 113 grams of butter is too little and would not cream and fluff well. So, for situations like these I use my 3-quart stainless steel bowl. They are great for small batches and recipe testings! If you don’t have one of these small mixing bowls, you can either double the recipe (you can freeze the extra dough) or use a hand mixer instead.
- The chilling step is very important. If you do not chill the dough before rolling, it will be sticky and difficult to manage.
- Be careful not to roll the dough too thin and remember to flour everything and often so the dough doesn’t stick to your hands or to your rolling pin.
- Before you start rolling the dough, press down firmly on it to avoid any gaps in the center of your pinwheel cookies.
- The amount of food coloring you add will depend on the type you use and how saturated you like the colors to be. Start with 1/8 teaspoon and add from there.
- To make these holiday pinwheel cookies even cuter and more fun, roll the dough log in colored sanding sugar or colorful sprinkles before chilling.

FAQs
How do I store
Store baked holiday pinwheel cookies in an airtight container. It will last at room temperature for up to 1 week.
Can I make ahead?
The log of dough can be frozen for up to a month and take it out anytime you are craving for a cookie, if you have unexpected guests, or if you need to make an instant gift for a host!
How to add flavoring?
Add ½ teaspoon of extract along with the vanilla extract.
For example, to make lemon and vanilla pinwheel cookies, add 1/2 teaspoon of lemon extract to the yellow-colored dough in addition to the vanilla extract.
Can I double the recipe?
Making for a crowd? Easily double or triple the recipe. Just take note though that the dimensions when shaping and rolling your dough would adjust too. More dough would mean a longer log-shaped dough.
Dough is sticking
Adding flour to your work surface and to your rolling pin will solve this sticky situation!

Watch How To Make It
❤️ Tried this recipe and loved it? If you made this recipe or any other recipe on this site, please leave a ⭐️⭐️⭐️⭐️⭐️ rating + review below – or tag @thebakeologie on Instagram and hashtag it #bakeologie !
Printable Recipe Card
Ingredients
- 180 grams all-purpose flour
- ½ teaspoon baking powder
- ¼ teaspooon fine salt
- 125 grams white granulated sugar
- 113 grams unsalted butter at room temperature
- 50 grams egg (without shell) about 1 large egg
- ½ teaspoon pure vanilla extract
- red and green food coloring (switch up the colors depending on the holiday!)
- sanding sugar or sprinkles optional
Video
Instructions
Prep
- Line your baking sheet with parchment paper.
Make the cookies
- Sift – Sift the flour, baking powder, and fine salt into a bowl.180 grams all-purpose flour1/2 teaspoon baking powder1/4 teaspooon fine salt
- Cream butter & sugar – In the bowl of a stand mixer fitted with paddle attachment, combine room temperature butter and granulated sugar. Beat on medium speed for about 3 minutes, until light and creamy.125 grams white granulated sugar113 grams unsalted butter
- Liquid ingredients – Add the egg and vanilla, then beat until combined. (See Note 4)50 grams egg (without shell)1/2 teaspoon pure vanilla extract
- Dry ingredients – Turn mixer to low speed. Add the flour mixture and beat until just incorporated. Do not overmix!
- Divide the dough – Scrape the dough into a lightly floured work surface and divide into three equal portions. I like to use a digital kitchen scale here to make sure the dough portions are of equal size.Using your hands, shape one portion into an even 5 x 3-inch rectangle. Wrap the rectangle in plastic wrap.red and green food coloring
- Color the dough – Return one of the remaining dough portions to the mixer bowl, add the red food coloring (See Note 1), and mix the dough on low speed until evenly colored. Dust the work surface with fresh flour, scrape the red dough out onto it, and then shape the dough into an even 5 x 3-inch rectangle. Again, wrap this red rectangle in plastic wrap.Wash and dry the mixer bowl and paddle, then repeat with the remaining portion of dough, add green food coloring and shape the dough into a rectangle. Wrap this green rectangle in plastic wrap.
- Chill – Refrigerate all the dough for at least 30 minutes.
- Roll the dough – If using sanding sugar, spoon the coarse sugar onto a large, flat plate or baking tray, creating a thin, even layer.Dust some flour to your rolling pin to avoid the dough sticking. On a lightly floured work surface, roll out each dough rectangle into a rectangle about 10 x 7 inches. (See Note 2)Starting with the white dough as the base, stack the rectangles on top of one another. Run the rolling pin over the stack a few times to ensure that everything is even and to also to compress the three doughs together. Be careful not to roll the dough too thin. The stack should roll out a few inches larger.Using a sharp knife, trim off a very small amount on all sides to create a perfect rectangle. Starting from the long side, roll up the stack tightly to create a log.Roll the log in the sanding sugar, coating it evenly, then wrap the log tightly in plastic wrap and refrigerate for at least 4 hours or up to overnight. You can turn the wrapped log a few times to prevent it from developing a flat side.sanding sugar or sprinkles
- Slice – Position oven rack in the middle of the oven and preheat to 350 F / 175 C.Remove the plastic wrap from the log. Using a sharp knife, cut the log into 1/4-inch thick slices. Arrange 15 slices on the baking sheet, spacing them evenly.Hold the remaining slices in the fridge until they are ready to bake.
- Bake – Bake the cookies for 10-12 minutes. As not all ovens are the same, watch for visual cues to know when your cookies are done. They should be a little puffed and set to the touch. A little browning on the bottom is okay. (See Note 3)
- Cool – Transfer the baking sheet to a wire rack and let cool for 5 minutes, then carefully transfer the cookies to a wire rack to cool completely before serving.


Mine didn’t look as pretty as yours but it sure was delicious! I will be making them again.