

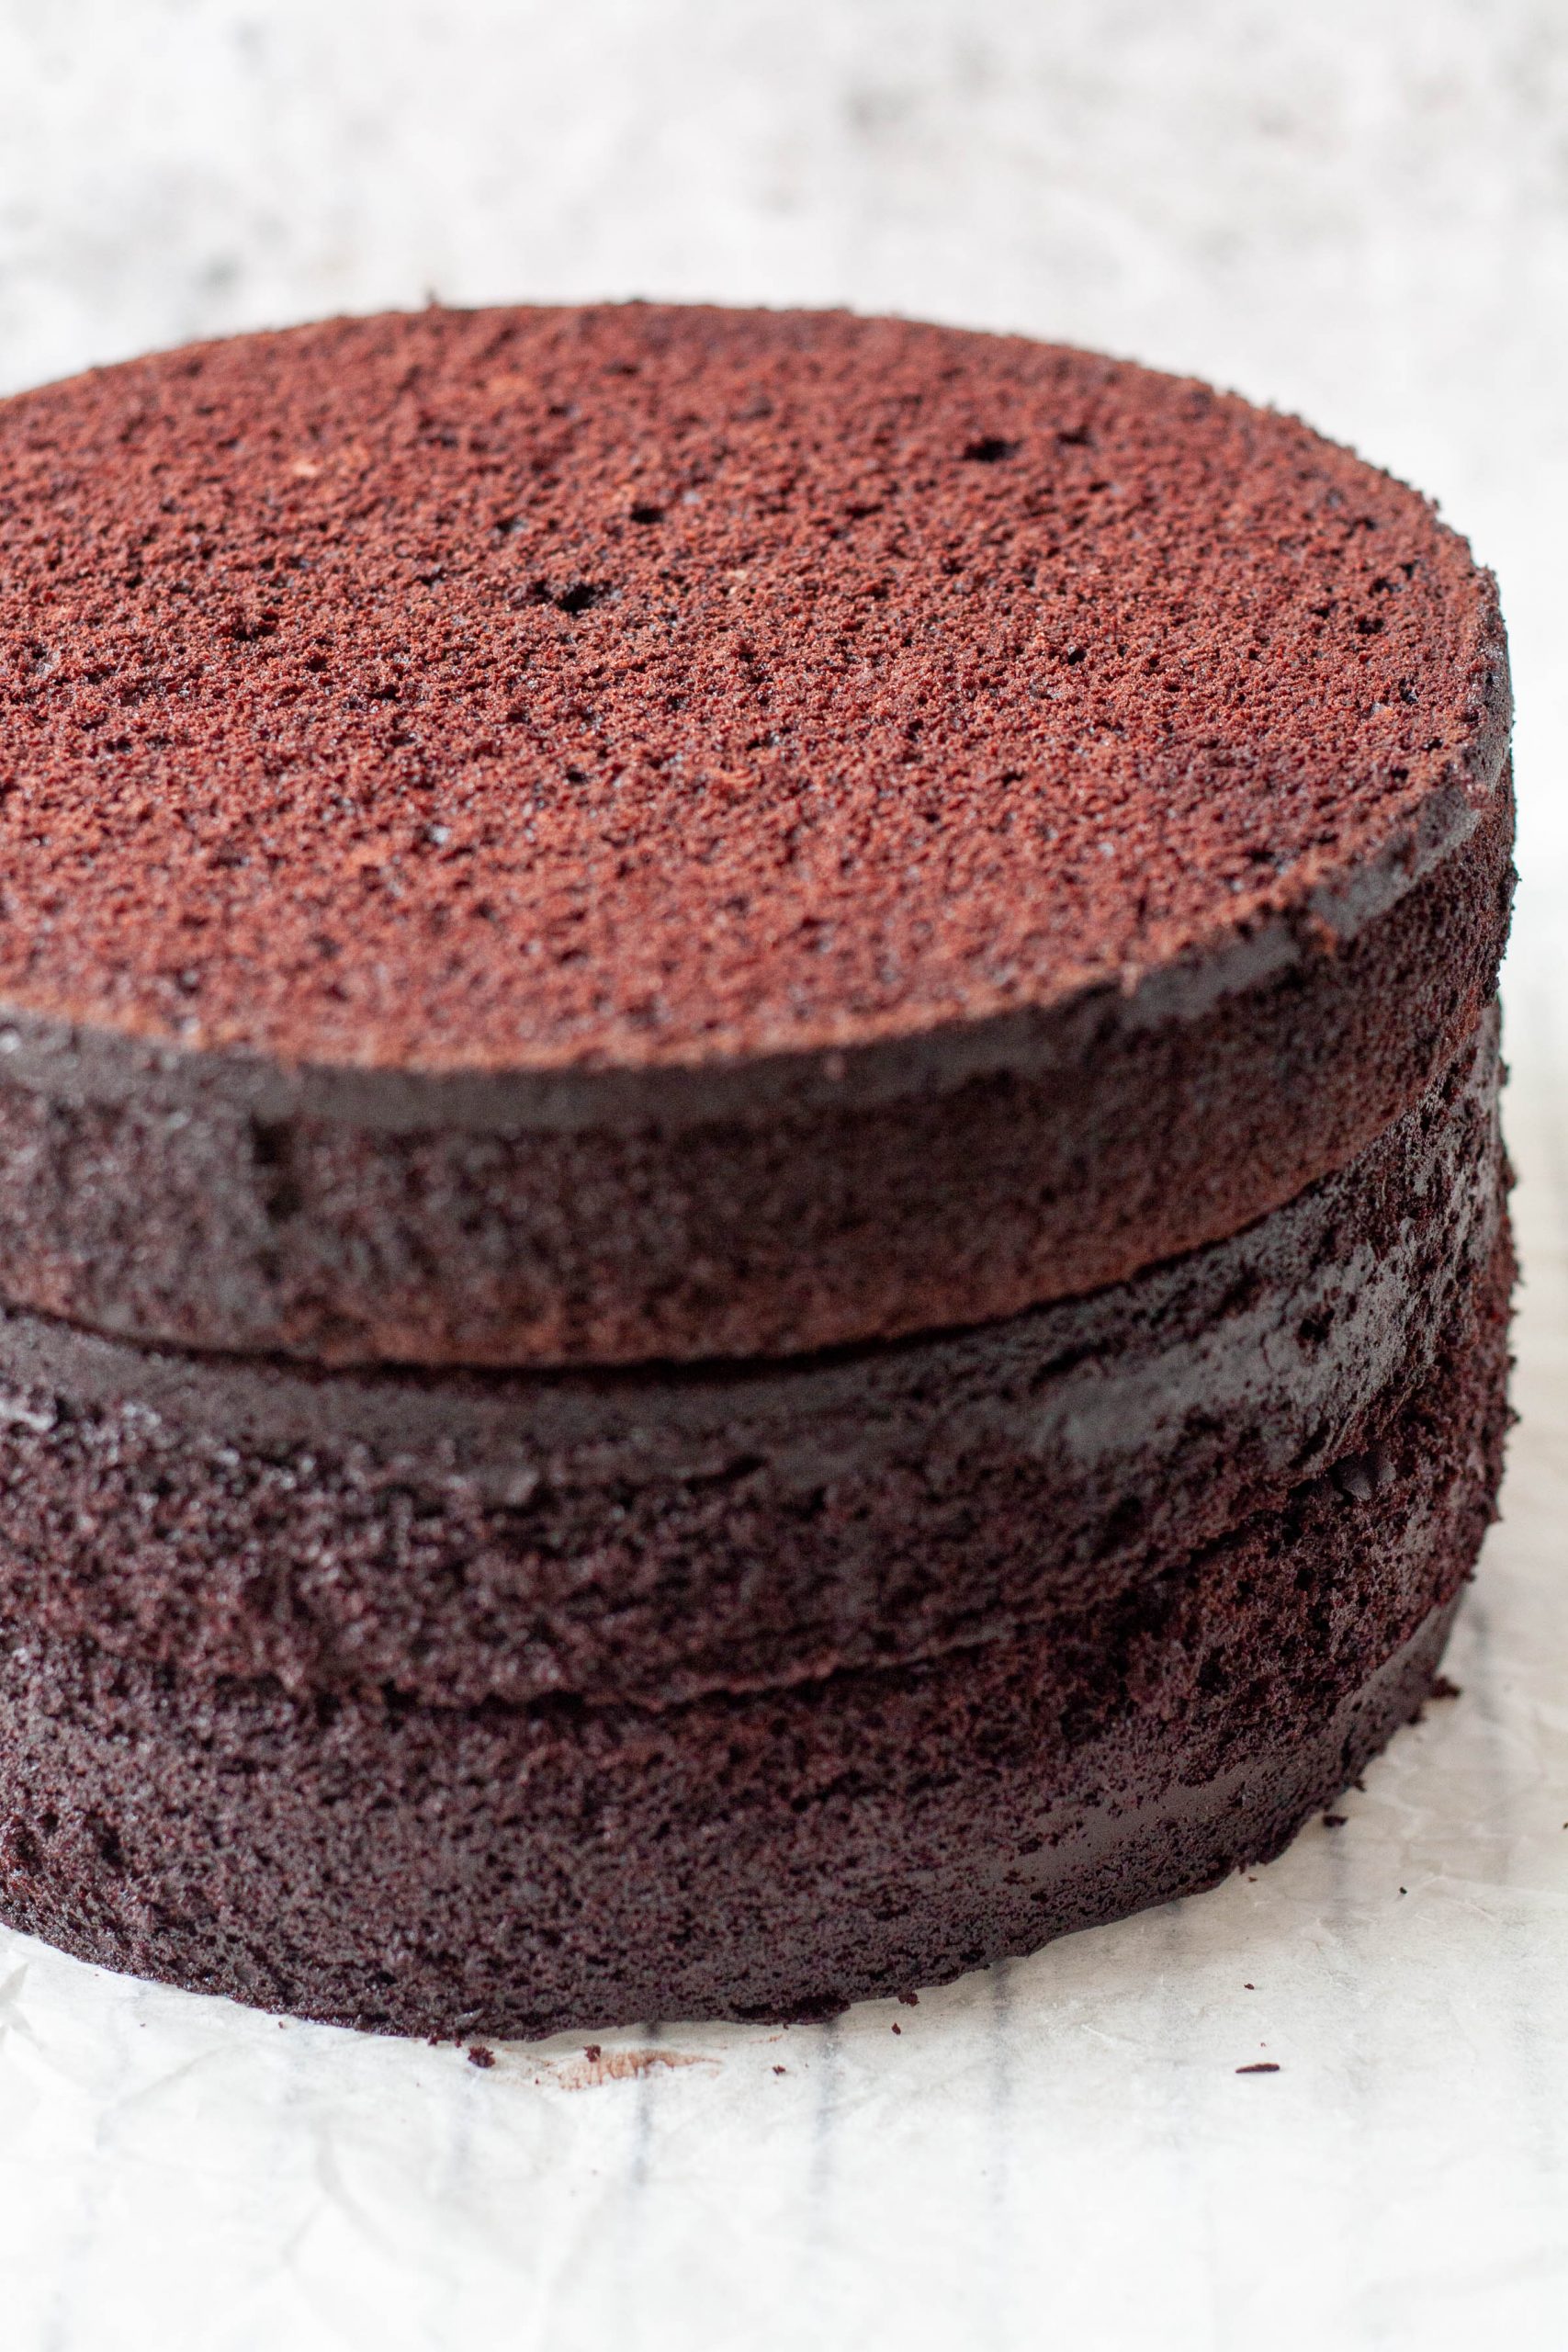
This is the chocolate cake I reach for when it has to work.
It’s soft, deeply chocolatey, and incredibly moist—but strong enough to stack, carve, and hold its shape without collapsing. No guesswork. No fragile layers. Just a reliable, bakery-style chocolate cake that delivers every time.
Need this in a different pan size? Get precise, tested ingredient quantities for every pan size from 4-inch to 12-inch rounds here.
🎂 Free Download:
Not ready for the full master recipe yet?
Get my Chocolate Cake Pan Size Quick Guide and scale your cakes without guessing.
⭐ What Bakers Are Saying
⭐️⭐️⭐️⭐️⭐️ “Amazing! I’ve been looking for chocolate cake sturdy to stand yet moist in texture. This ailed it and bonus I could make enough mixture for 4 cakes. I used all the weight measurments you listed. Thank you.” – Kat
⭐️⭐️⭐️⭐️⭐️ “Fantastic recipe! I used your cake in my novelty cake and got rave reviews! It’s so moist and chocolatey I didn’t need the simple syrup at all! It was sturdy and I will be making this my ‘go to’ chocolate cake recipe! Thank you!” – Kathy
⭐️⭐️⭐️⭐️⭐️ “Hi, I love this recipe and have used it for a couple of celebration cakes as well as a wedding cake. Had loads of compliments so thank you… ” – Amanda
Not convinced yet? Check out more in the comments section below!
Recipe in a Glance
- Texture: Soft, fine crumb but sturdy enough for stacking
- Flavor: Deep chocolate, not overly sweet
- Ease: Beginner-friendly (no fancy techniques)
- Time: ~1 hour + cooling
Why You’ll Love This Recipe
This chocolate cake is based on my Fluffy and Buttery Vanilla Cake, which has been one of the most popular recipes on my site. After getting tons of requests for a chocolate version—this is it.
It’s the kind of recipe every baker needs in their back pocket. It works for birthdays, celebrations, or even wedding cakes—and pairs well with almost any frosting.
Taste and Texture
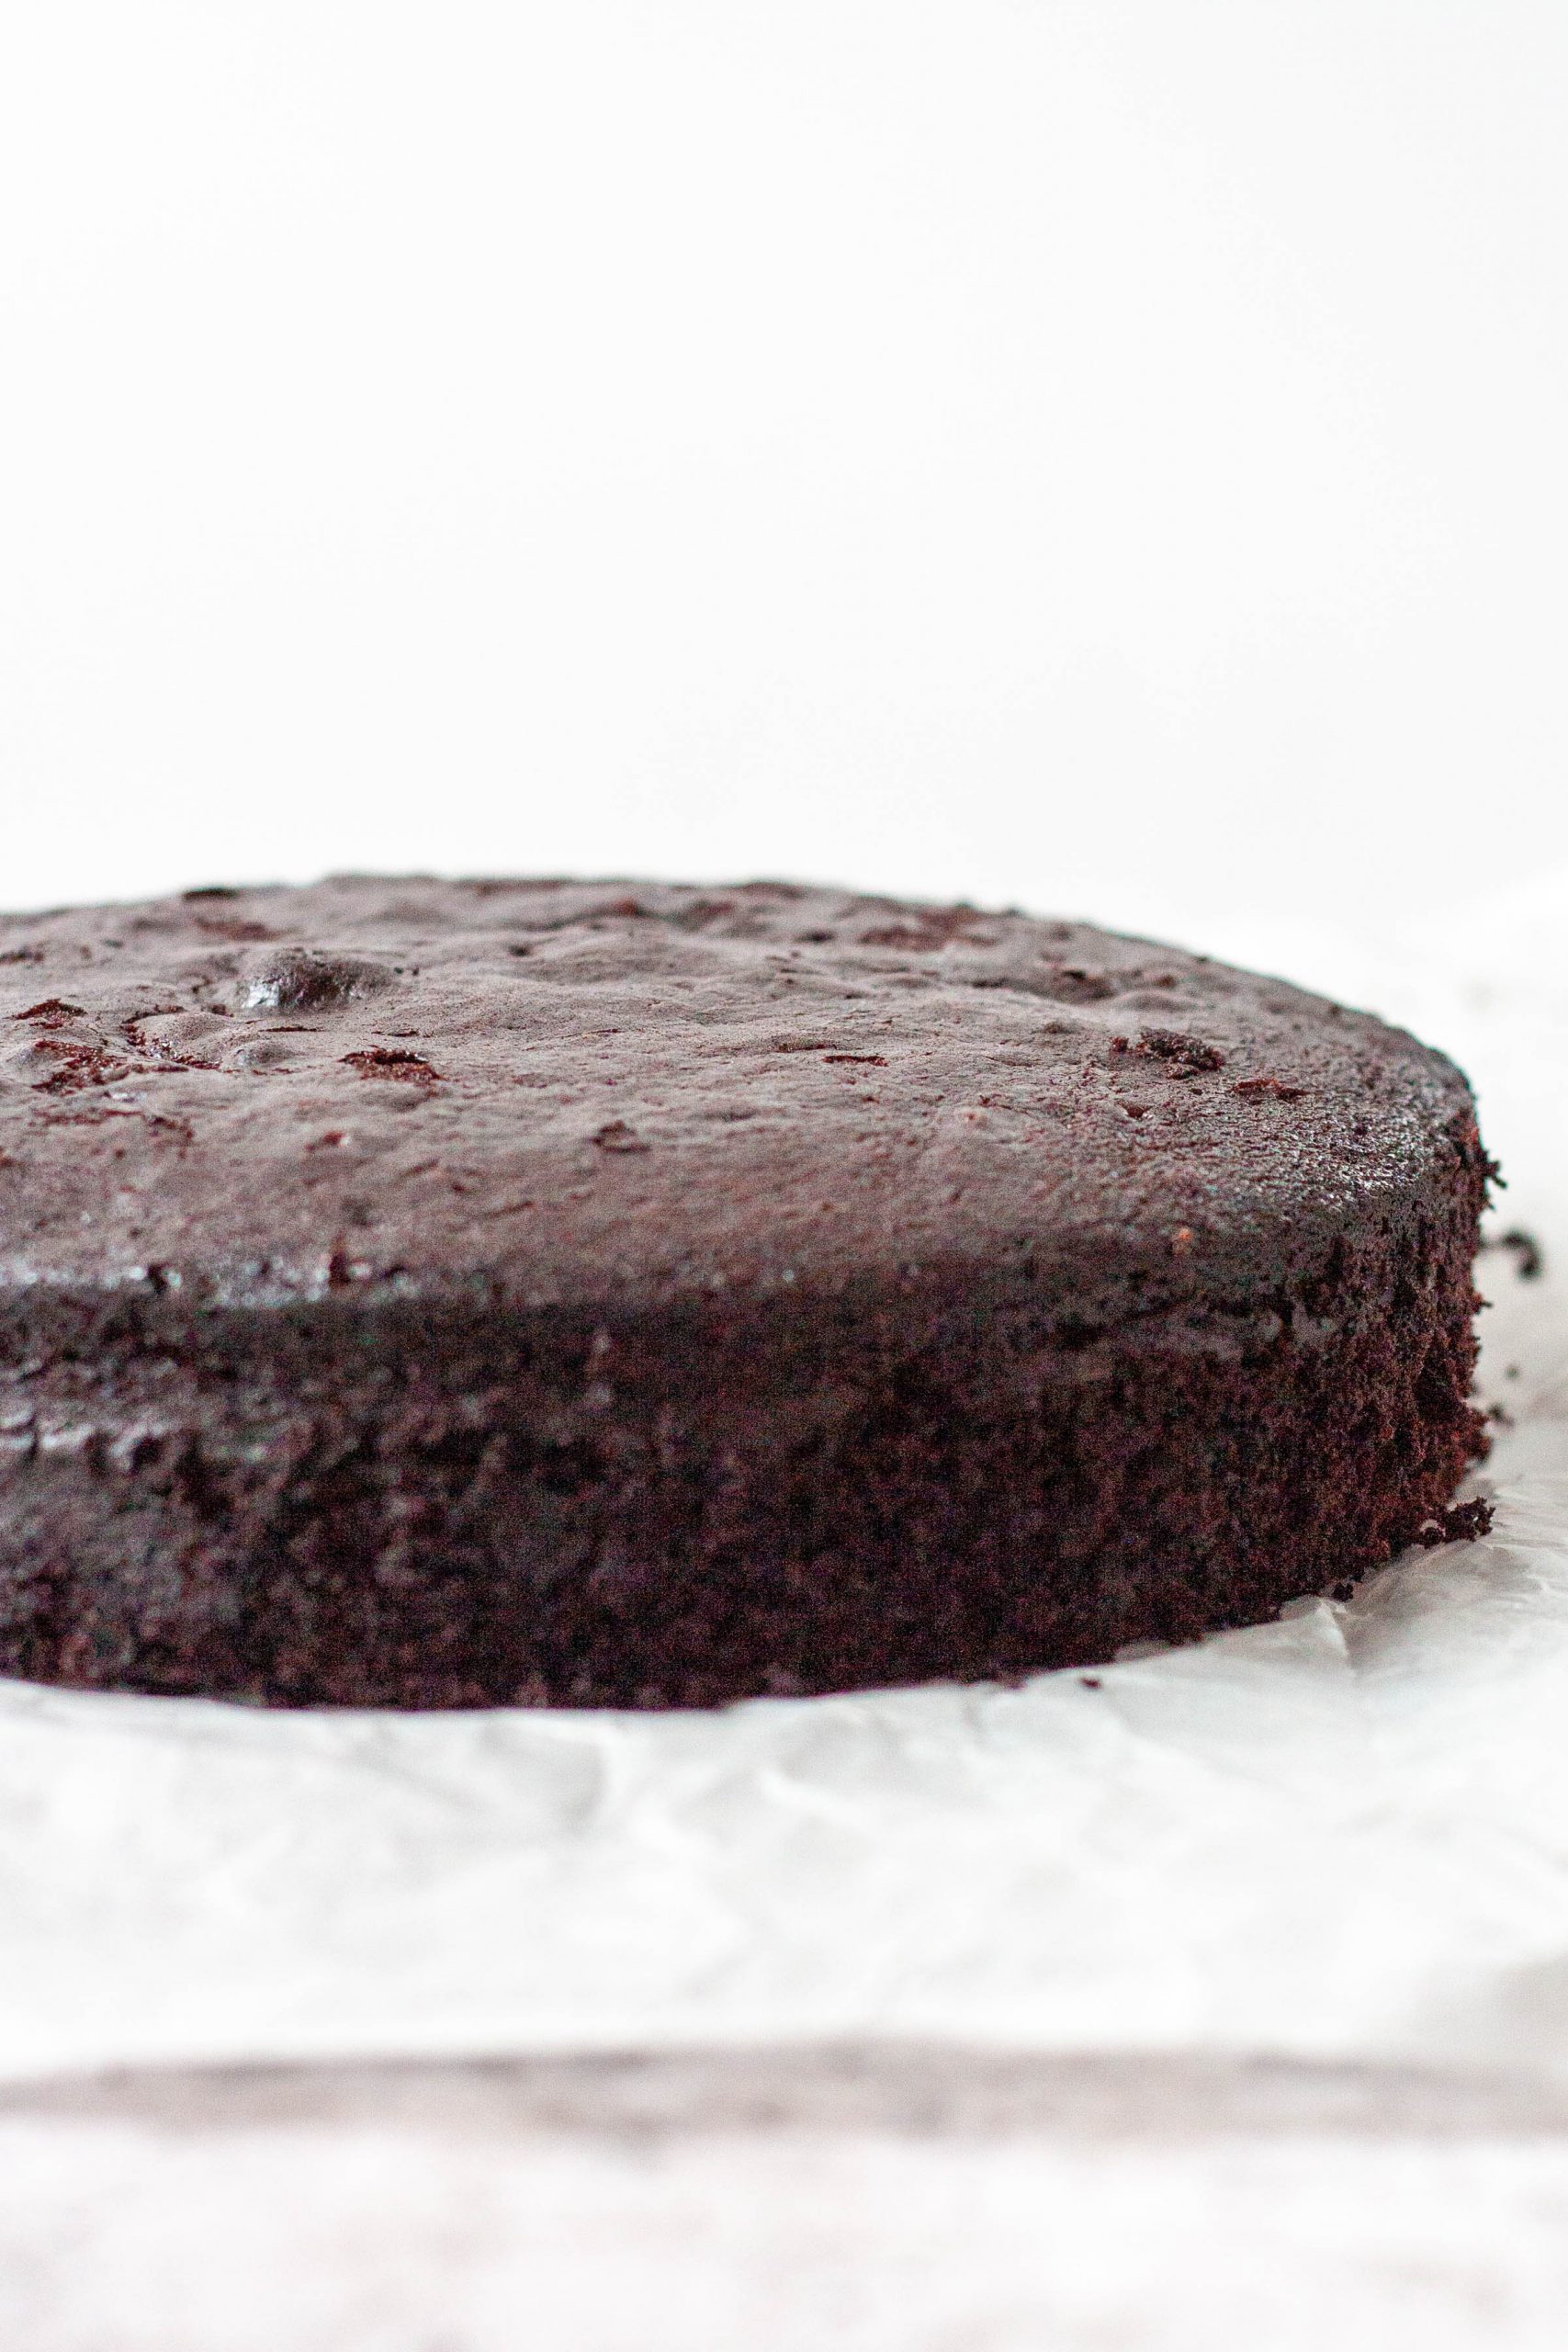
The cake has a soft crumb but it is sturdy enough for stacking and carving. It is not fudgy but it is definitely moist and has a concentrated chocolate flavor without being too sweet.
Thanks to the cocoa dissolved in boiling water; it gives the cake an extraordinarily full and intense chocolate flavor. I used the same method in making my favorite basic chocolate cupcake.
Overall, I thought this chocolate cake is great to be in a baker’s back pocket. It is great for any special occasion and any frosting will work with it!
Baking in Different Cake Pan Sizes
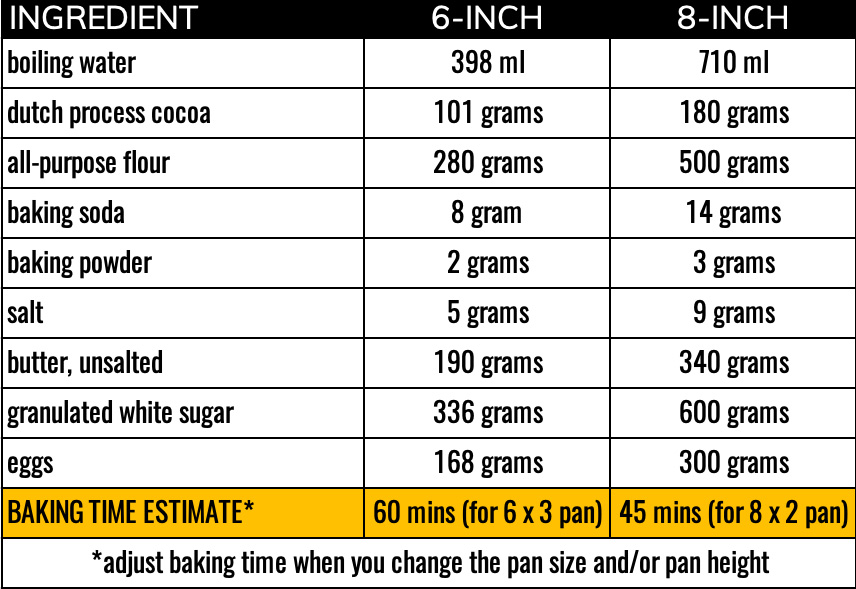
Here is a chart of the amount of ingredients you’ll need depending on pan size:
Follow the same procedure as written in the recipe but you may need to adjust the baking time. Remember that the time indicated below is only a guide as not all ovens are the same.
⭐️PRO TIP: Use a thermometer. ⭐️
Cakes are done at 200–205°F (93–96°C)—this is the most accurate way to avoid dry, overbaked layers.
Want a quick cake sizing cheat sheet for reference?
👉 Download the free Chocolate Cake Pan Size Quick Guide here:
For the purpose of testing, I baked each size in two different cake pan heights:
- For the 6-inch cake recipe, I used a cake pan that is 3 inches in height (6×3).
- For the 8-inch cake recipe, I used a cake pan that is 2 inches in height (8×2).
6-inch Chocolate Cake for Stacking
For the 6-inch cake recipe, I divided the batter into two 6×3 pans.
This is the exact baking pan I use and I really do recommend this brand (not sponsored – I just really love their baking pans!) .
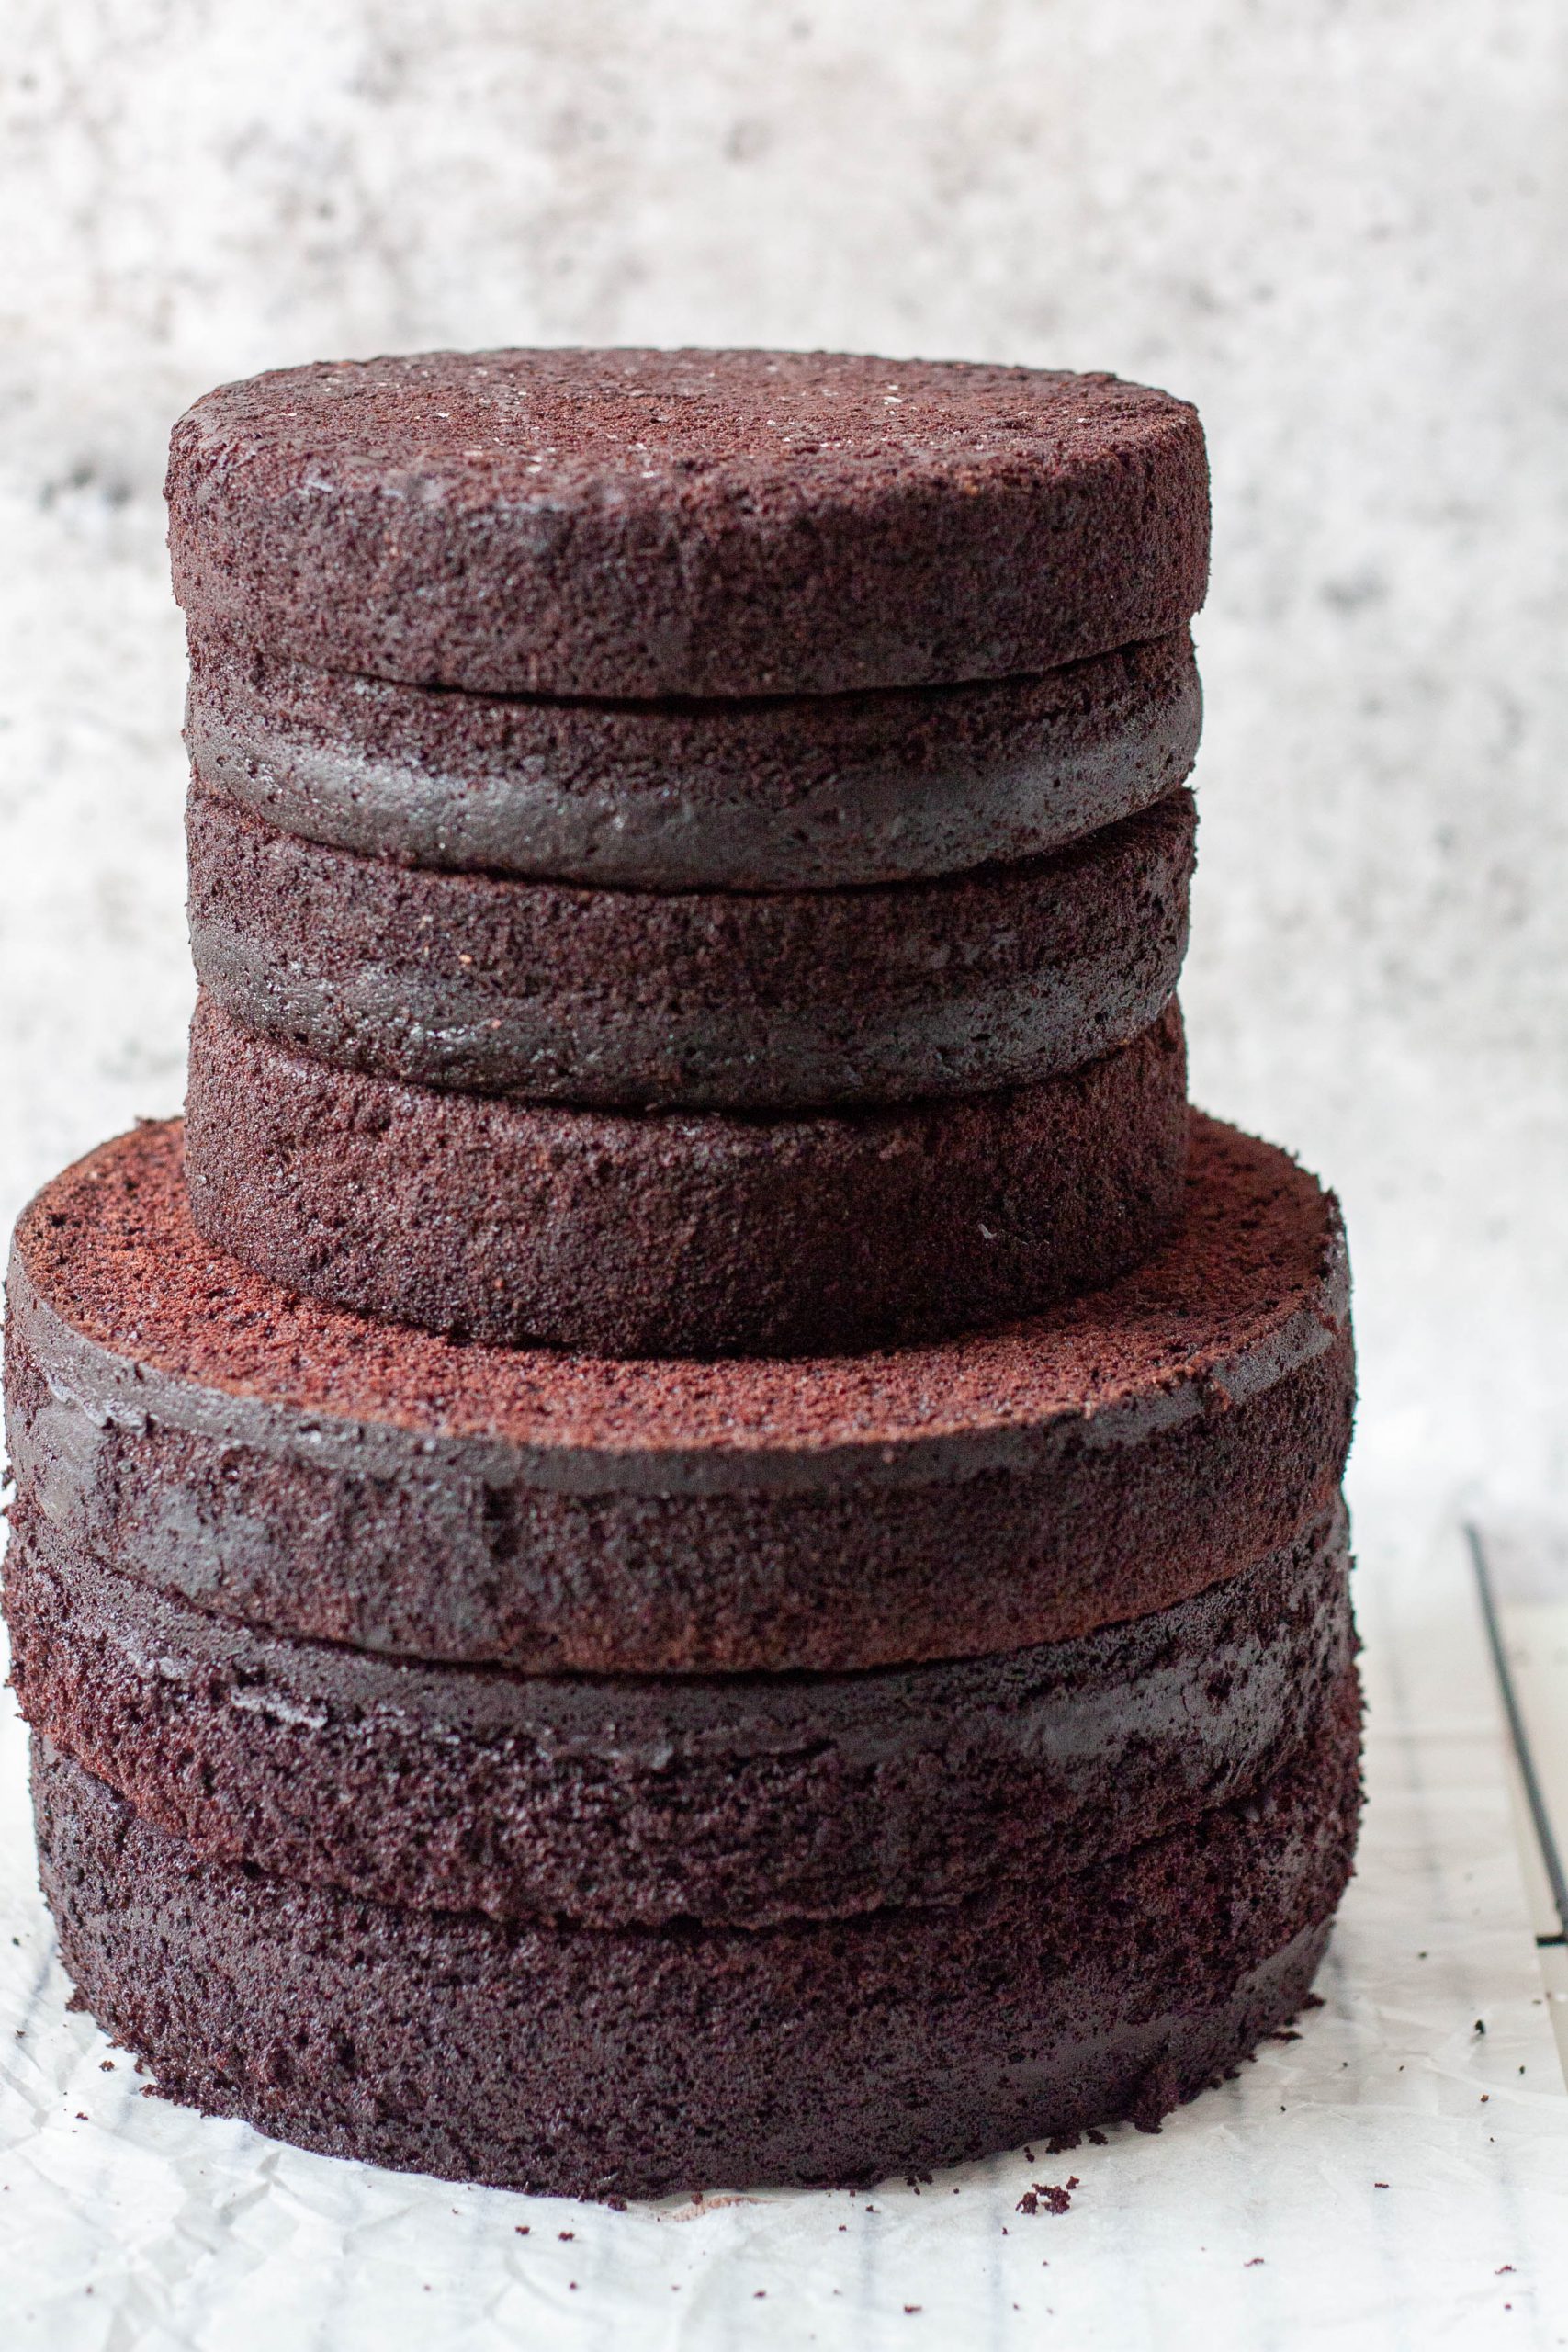
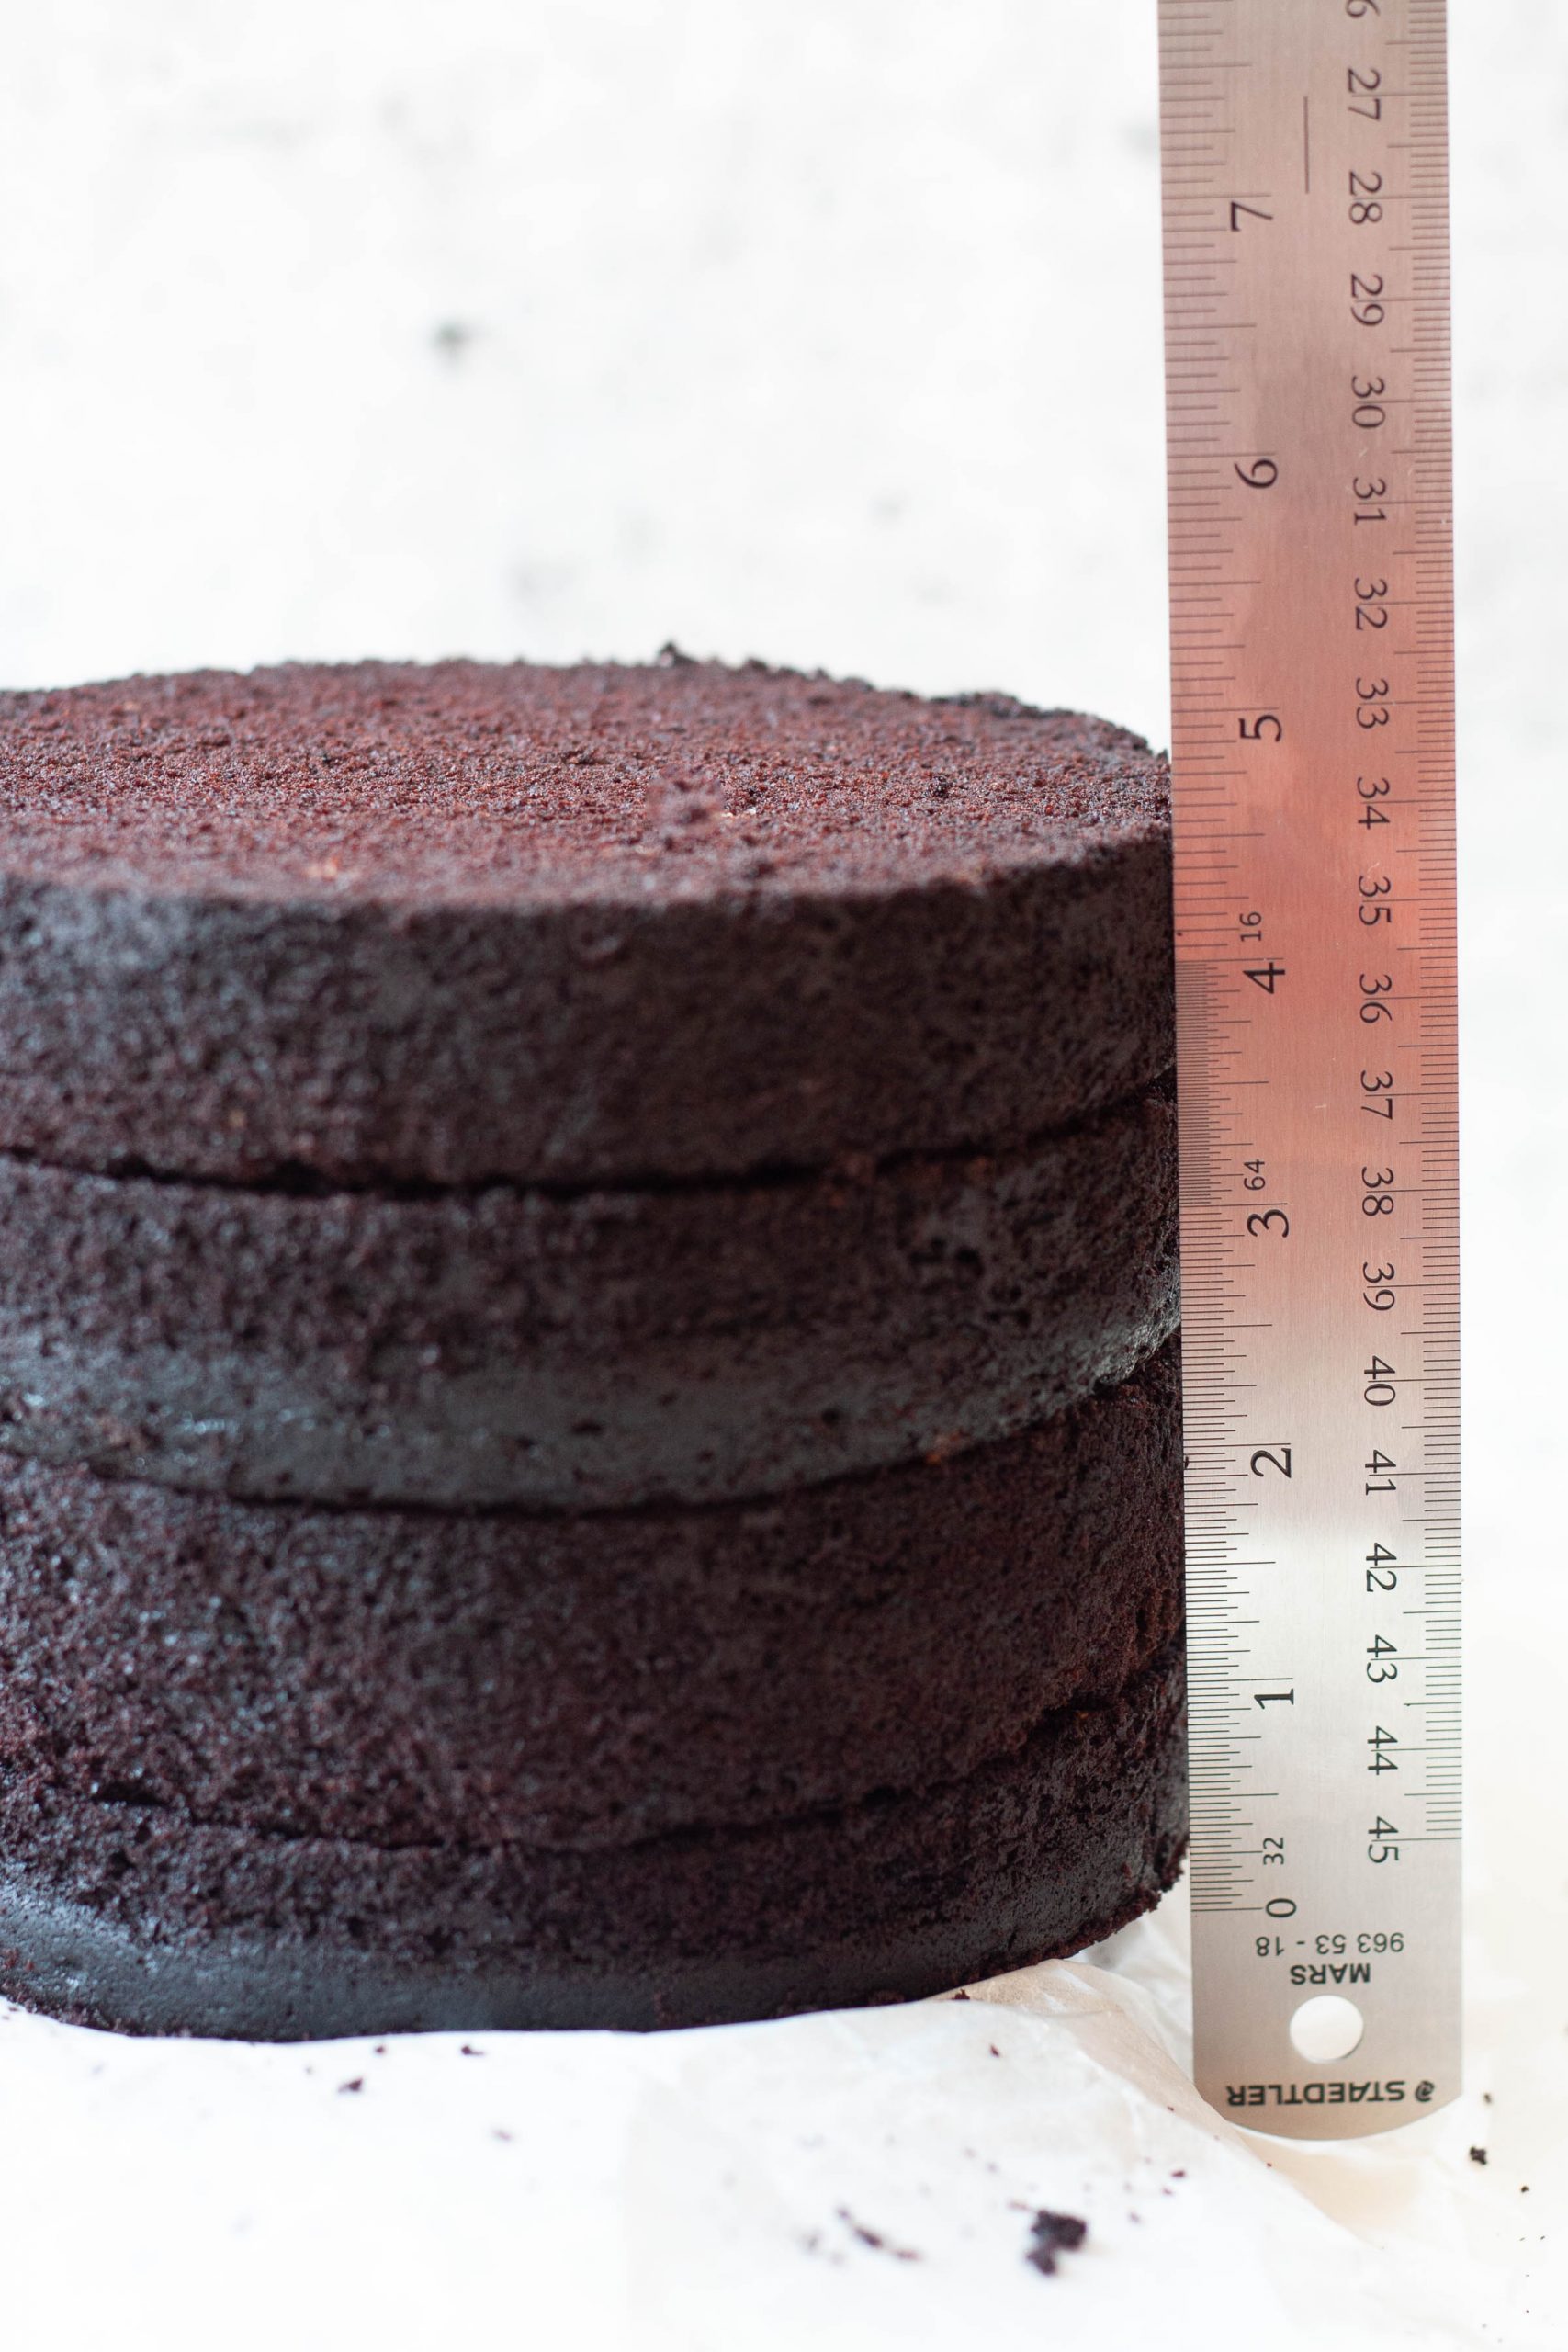
This yields tall layers (about 3 inches each before leveling). After torting each cake into two layers, you’ll have four layers total—perfect for a tall, bakery-style cake.
After filling and frosting, the final cake can reach over 5 inches tall.

TIP: If you only have a cake pan that is less than 3 inches in height, an alternative is to line parchment around the cake pan for added height, just like what I did in my Vanilla Cake.
8-inch Chocolate Cake
For the 8-inch cake recipe, I divided the batter into three 8×2 pans.
Each layer bakes up close to 2 inches tall. The cakes rise right to the top, and using cake strips helps minimize doming for more even layers.
You can also use two 8×3 pans—just increase the baking time.
This time, I used cake strips, and you can really see the difference in terms of doming!

Tired of guessing how much batter you need for different cake sizes?
Here’s how to NEVER mess up cake sizing again. If you’ve ever ended up with too much batter—or worse, not enough—this is exactly why I created this guide.
This recipe has already worked for thousands of bakers:
⭐️⭐️⭐️⭐️⭐️ “When you say “best chocolate cake” you seriously aren’t kidding – this was AMAZING. I made this with an orange-flavored version of your swiss meringue buttercream, and everyone absolutely loved it. The crumb and the texture are lovely, it’s the perfect density for stacking, and the flavor is wonderfully bitter-sweetly chocolatey (not sugary)… – Molly”
⭐️⭐️⭐️⭐️⭐️ “I’ve used this recipe 3 times, and it comes out perfectly every time! I recently made this for my brother’s birthday and the cake turned out moist, sturdy, and delicious (and not too sweet)! – Uma”
The Master Recipe for Sturdy Yet Moist Chocolate Cake gives you:
- Tested ingredient amounts for 4-inch to 12-inch cakes
- Scaling charts (no math needed 🙌)
- Visual doneness cues
- Pro tips for consistent results every time
👉 Grab it here.
Vanilla version is also available here.
How Much Buttercream Do I Need?
Once you know your cake size and number of layers, use my buttercream cake size chart to estimate how much you’ll need for filling, crumb coating, and frosting.
Ingredients & Substitutions
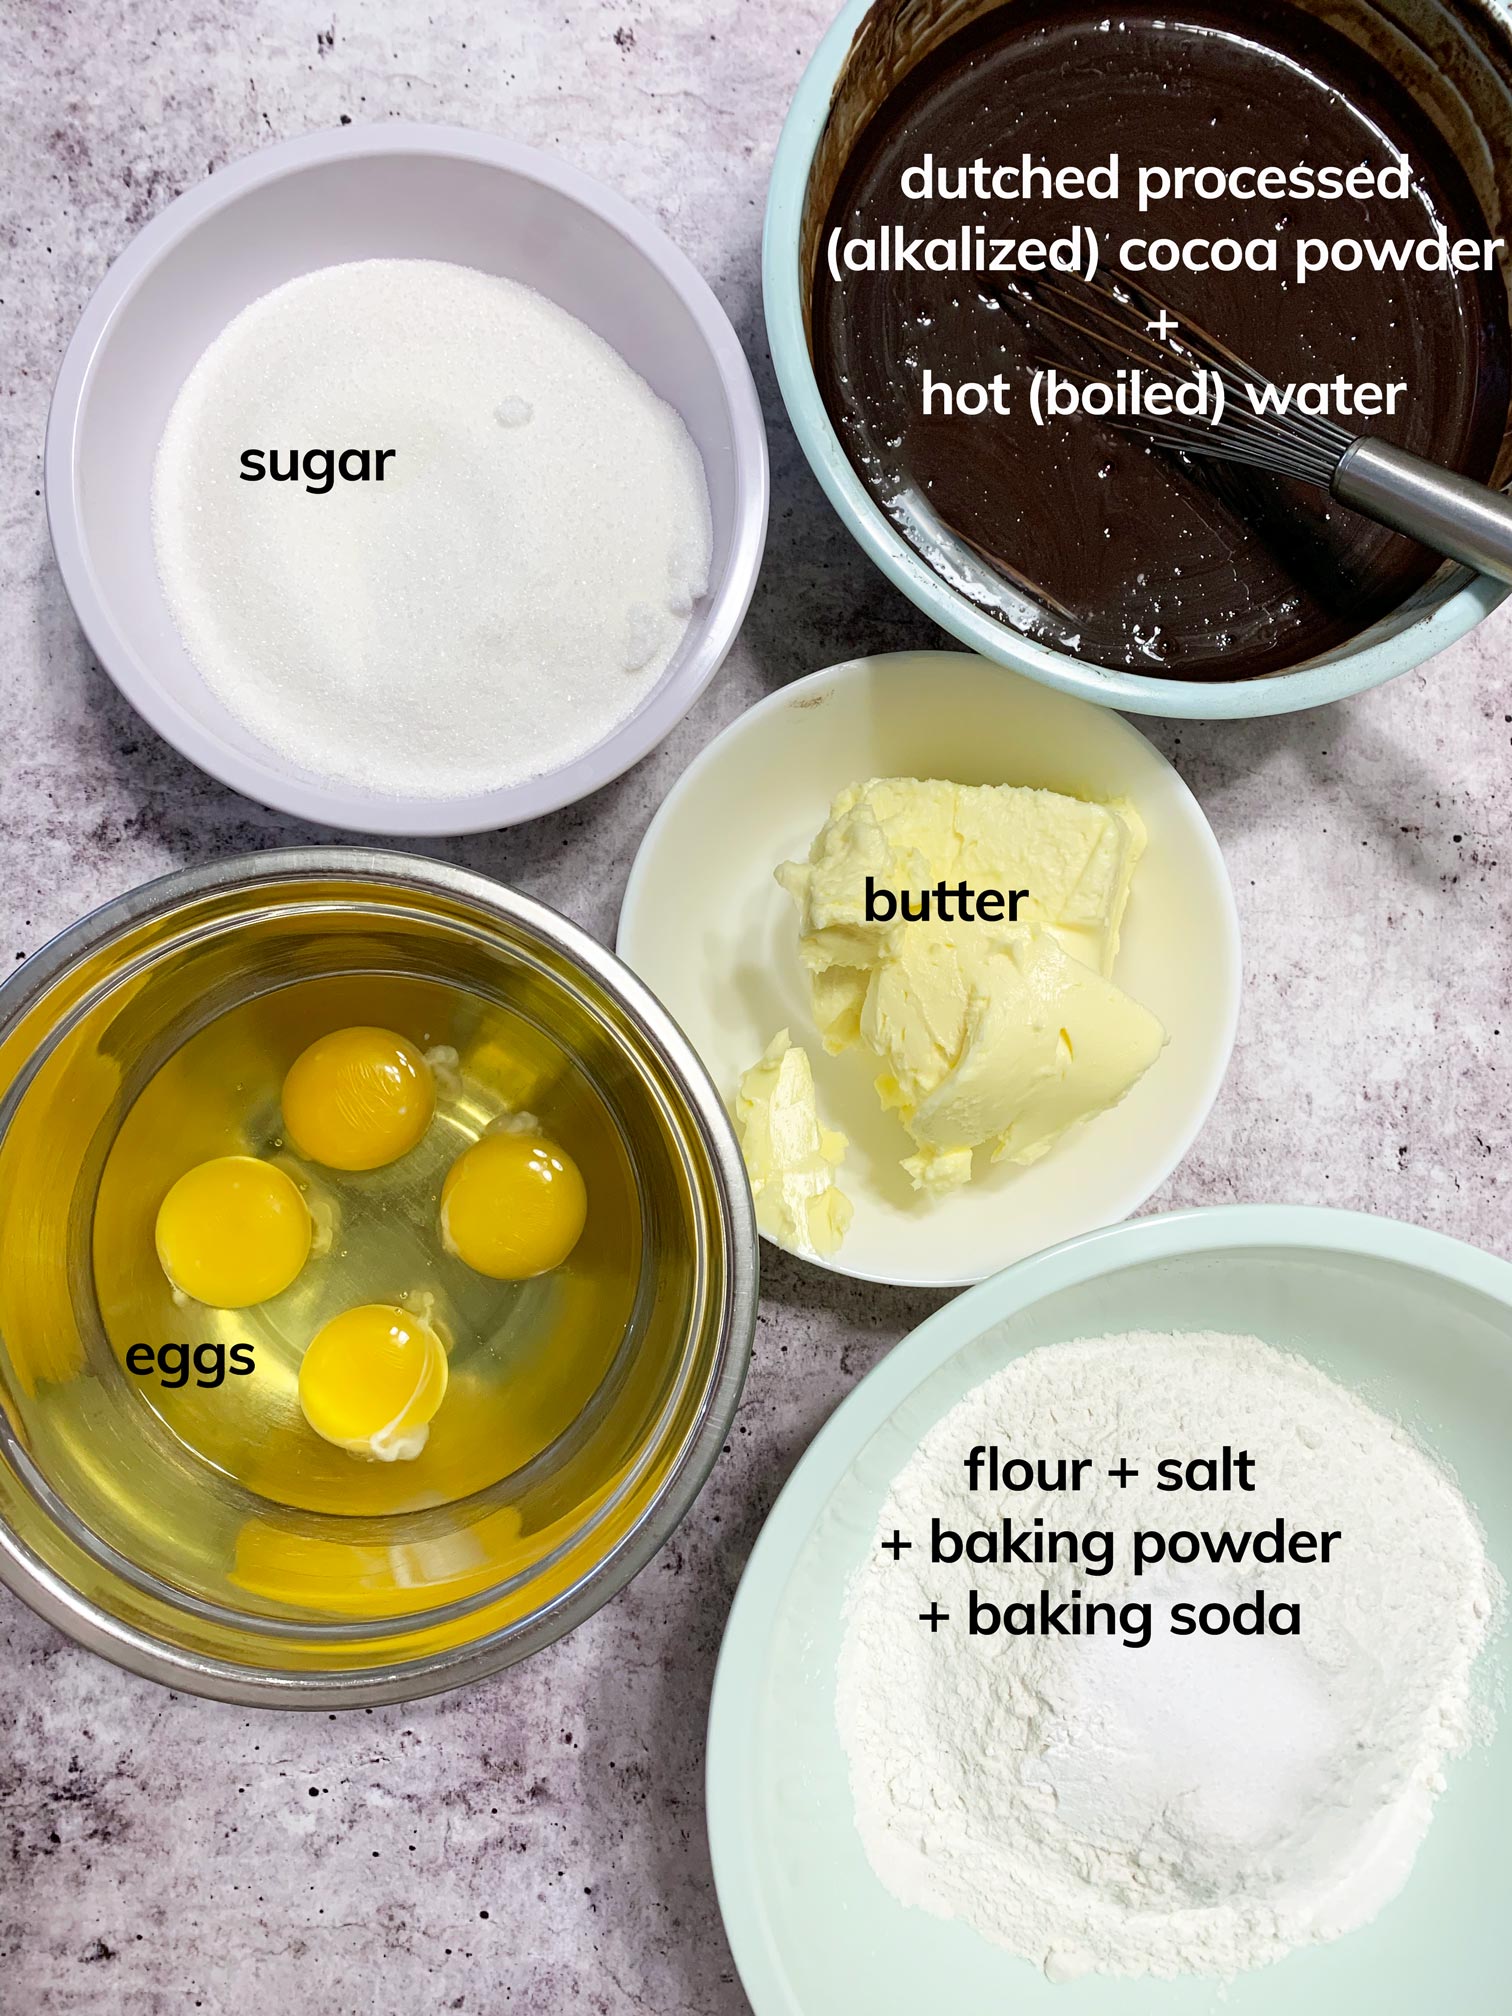
Shop efficiently (treat this as your grocery list) and gather your ingredients at home without running circles in your kitchen. (i.e. One trip to the fridge to get all your dairy needs.) You can still find the full printable recipe at the end of this post.
***The ingredient quantities listed below are for the 8-inch recipe. ***
REFRIGERATED:
- butter. 340g of unsalted butter, at room temperature. What is Room Temperature Butter?
- eggs. You need 300 grams of eggs (weight is without shell). That is about 6 large eggs, at room temperature.
PANTRY:
- Dutch processed cocoa. Sometimes called alkalized cocoa; it is unsweetened cocoa that has been treated with an alkali to make it pH neutral. You need 180grams.
- water. 710g or about 3 US cups of boiling water.
- flour. 500g of all-purpose flour – measured by weight and not by cups. This recipe uses a lot of flour and any excess amounts will make your cake dry and too dense. I don’t recommend using cake/pastry flour as we need a higher protein content to make this cake sturdy.
- baking soda. 14 grams or 1 tablespoon. Baking Soda loses its leavening power over time so always check yours is still good.
- baking powder. 3 grams or 3/4 teaspoon. Baking powder do expire so always ensure your batch is still good.
- Salt. 9 grams or 1.5 teaspoon of fine sea salt/ table salt.
- sugar. 600 grams or 3 cups of granulated white sugar. You can use caster sugar in place of white granulated sugar, but be sure to measure by weight, not volume, as the finer grain size means it packs differently in a measuring cup.
How To Make The Best Chocolate Cake for Stacking & Carving
The steps to make this chocolate cake are actually simple.
STEP 1. MISE EN PLACE. Prepare your oven by preheating it to 350 F (175 C). Note that I am using a conventional oven (no fan).
Grease and line the bottom of each cake pan with parchment paper. Instead of dusting the pan with flour, use cocoa powder.
In a separate bowl, prepare the flour mixture by sifting together your dry ingredients: flour, baking powder, baking soda, and salt.
STEP 2. Preferably in a bowl with a spout, whisk the cocoa and boiling water until smooth. Set aside to cool while you make the batter.
STEP 3. In the bowl of a stand mixer fitted with a paddle attachment, beat the butter and sugar on medium speed until light and fluffy. This process takes about 8 minutes – the butter should turn very pale yellow, almost white in color.
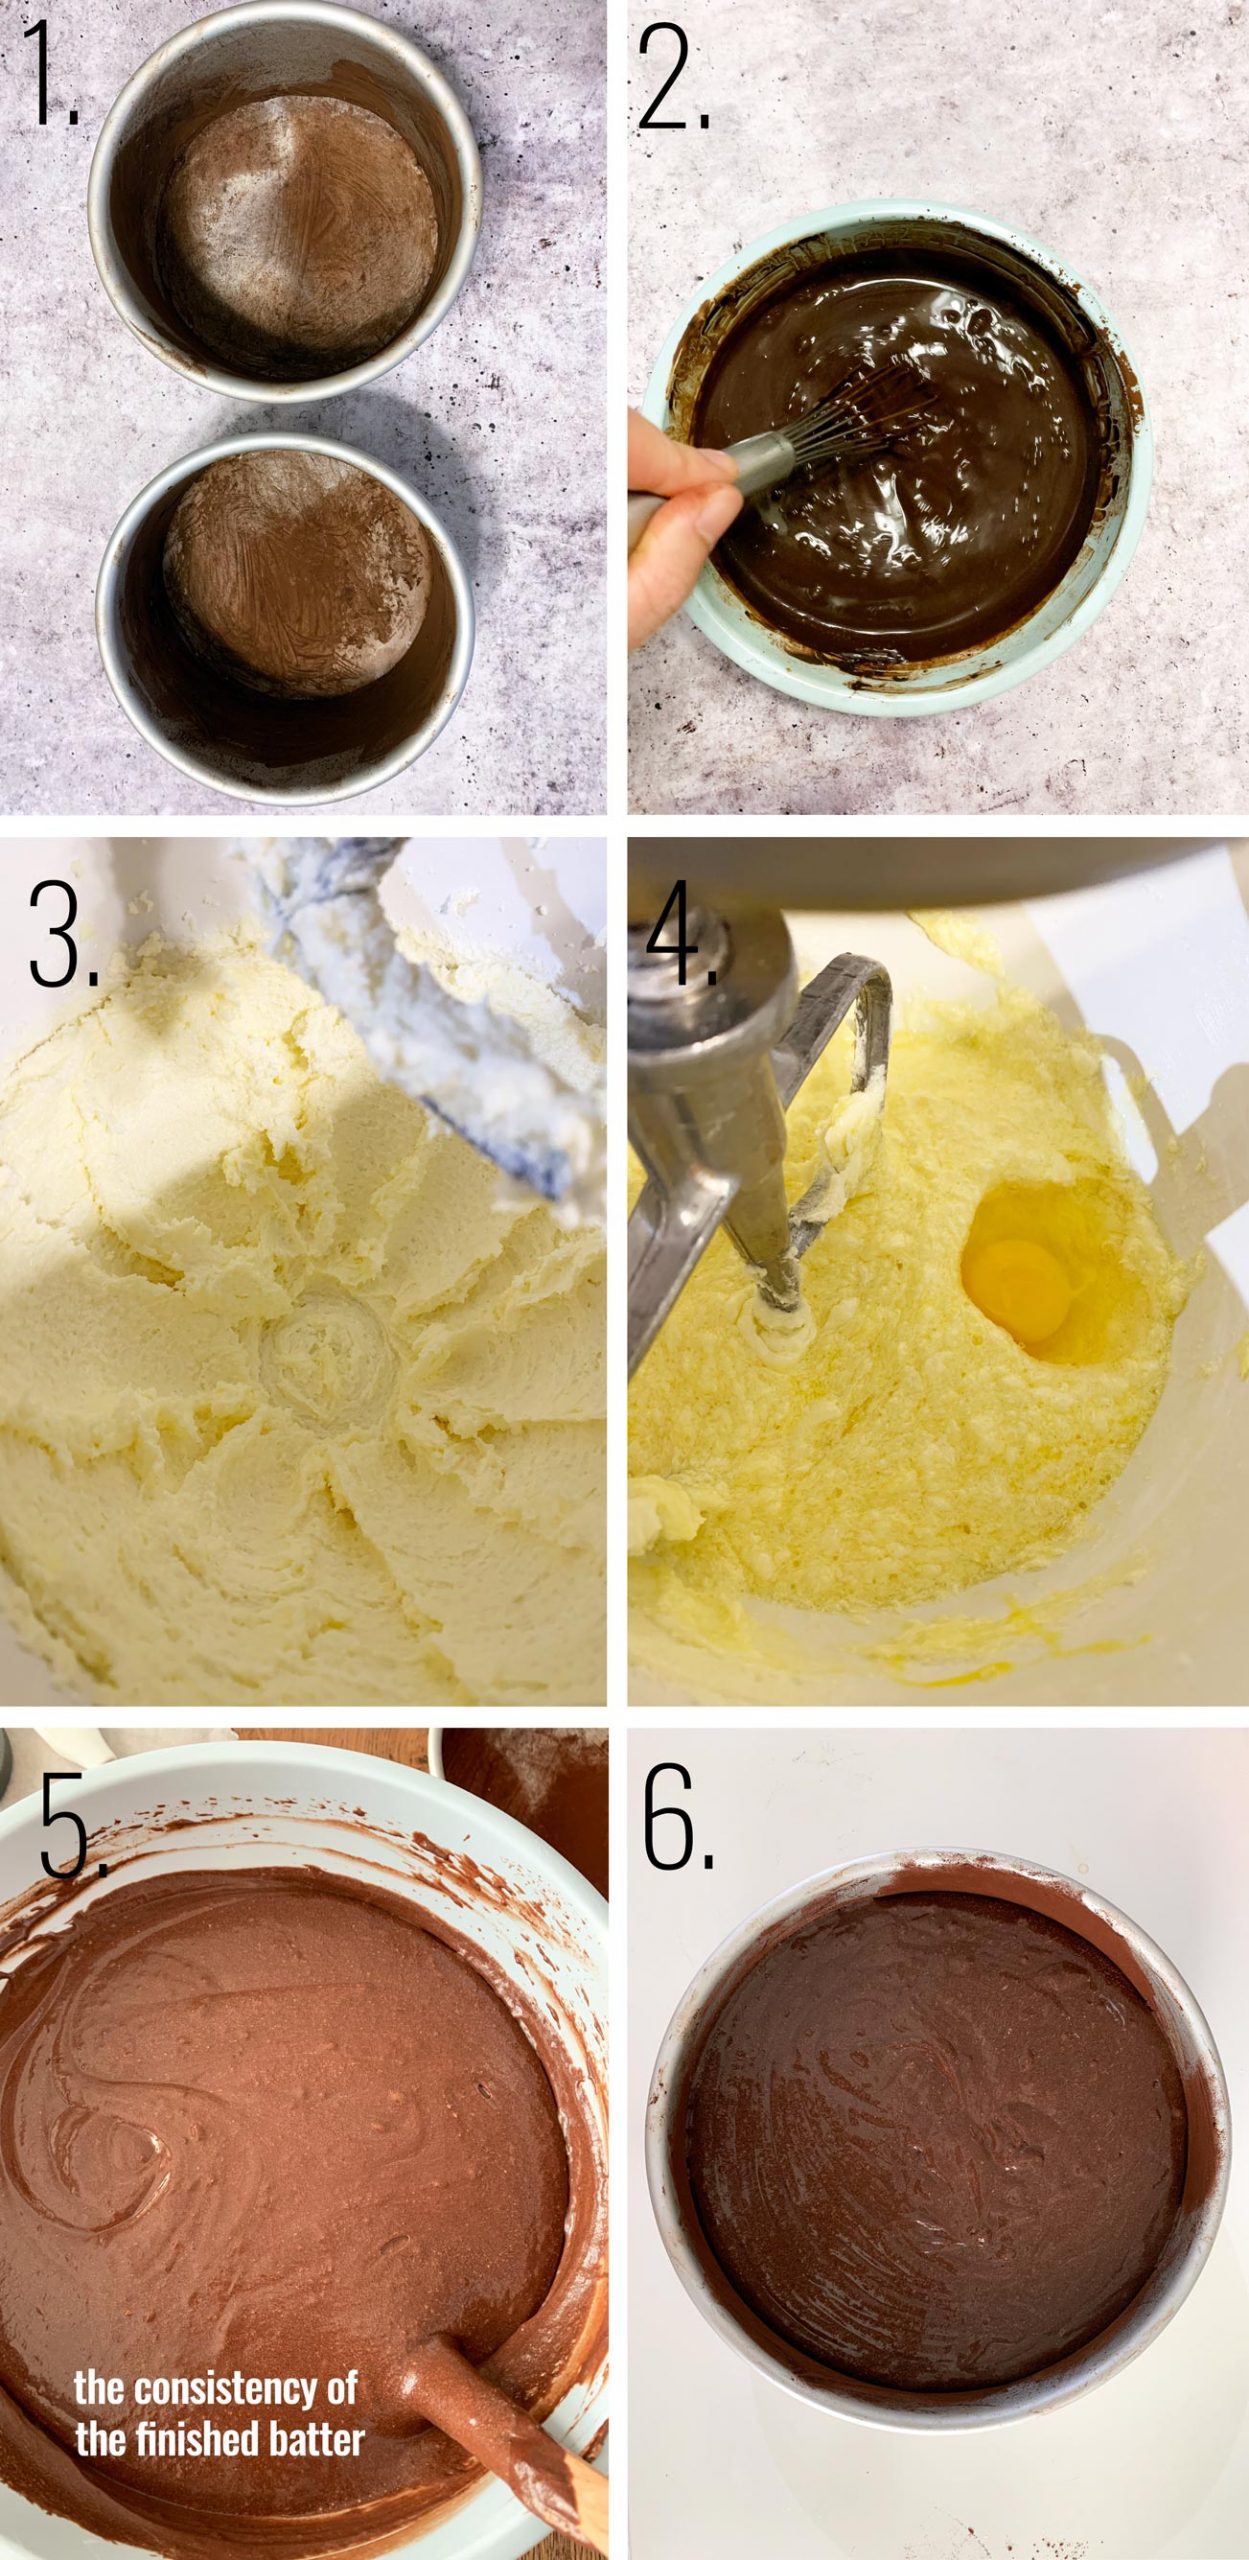
STEP 4. Add eggs, one at a time, beating until each addition is incorporated. Scrape the bottom and sides of the bowl.
STEP 5. Add the flour mixture four times, alternating with the cocoa mixture in three parts, beating until each addition is incorporated.
STEP 6. Divide the batter in your pans and bake until a cake tester inserted into the centers come out clean. Cool the cakes in the pans on wire racks before using them.
NOTE: Not sure what’s medium, medium-low, or low speed in your mixer? Read this Stand Mixer Speed Control Guide.
Freezing and Make Ahead
After the cakes have been removed from the pan and have completely cooled down. Double wrap each layer with plastic/saran wrap and keep in the fridge for up to 2 days. I did this when I used the vanilla version of this recipe for a wedding cake.
If longer than 2 days, I suggest keeping them in the freezer instead. If freezing, double wrap it with plastic/saran wrap then wrap again in foil. The first layer keeps the cake tight and fresh and the aluminum foil ensures no condensation will seep in.
When you are ready to use the cake, transfer the wrapped cakes from the freezer to the refrigerator one day before assembling. Take them out of the freezer container to thaw, but leave them wrapped in plastic wrap/aluminum foil.
The cakes take at least 8 hours to thaw completely in the refrigerator. Make sure you’re thawing the cakes while they’re still in the wrapping. Condensation forms as foods thaw. This way the condensation will form on the wrapping, not the cake.
Frequently Asked Questions
Technically, yes, but I don’t recommend it for this recipe. The Dutch Process Cocoa powder is in the recipe mainly for flavor and color. If you use natural cocoa powder, your cake would be lighter in color and you may notice a subtle tanginess or a slightly bitter edge to the flavor. This is due to natural cocoa’s acidity, which may not be fully neutralized by the remaining ingredients in the recipe.
No need to totally cool it down. Just set it aside while you make the batter, so that’s about 10 mins.
Given that proper stacking has been done, this chocolate cake like its vanilla version is sturdy enough for multi-tiered cakes. There have been many reviews that they’ve used this recipe for tiered cakes.
Yes, this sturdy chocolate cake can hold the weight of fondant.
Coffee enhances the chocolate flavor so the answer is yes. A couple of readers shared in the comments below that they have successfully replaced the water with coffee in equal amounts.
I’ve actually tested this recipe across different pan sizes, including 10-inch and 12-inch.
Because the ingredient amounts change quite a bit depending on the size, I put together a master recipe with exact, tested measurements for cake sizes from 4-inch up to 12-inch—so there’s no guesswork involved.
👉 You can check it out here: [link to ebook]
It’s especially helpful if you’re making larger or tiered cakes!
As a rule of thumb, reduce oven temperature by 25 degrees F if using an oven with fan so that would be 325F or 160C. Check if cake is done 5 to 10 minutes earlier than the suggested baking time.
Vanilla Version
If you need to make a cake like this in Vanilla, head on to Fluffy and Buttery Vanilla Cake recipe.
I’ve used this recipe to make a 3-tiered wedding cake so I can say that while it is soft and fluffy, it is firm enough to use in multi-tiered cakes.


❤️ Tried this recipe and loved it? If you made this recipe or any other recipe on this site, please leave a ⭐️⭐️⭐️⭐️⭐️ rating + review below – or tag @thebakeologie on Instagram and hashtag it #bakeologie !

Sturdy Yet Soft and Fluffy Chocolate Cake
INGREDIENTS
- 710 grams boiling water (710 ml)
- 180 grams Dutch processed cocoa
- 500 grams all-purpose flour
- 14 grams baking soda (1 tablespoon)
- 3 grams baking powder (3/4 teaspoon)
- 9 grams fine salt (1 ½ teaspoon)
- 340 grams unsalted butter at room temperature
- 600 grams white granulated sugar (3 cups) *see notes on using caster sugar
- 300 grams eggs about 6 large eggs, at room temperature
INSTRUCTIONS
- Mise en place. Set the oven 350 ℉/ 175 ℃. Set an oven rack in the middle rack of the oven. Note that for all recipes in this website, I am using conventional oven (no fan). Grease and line the bottom of three 8×2 pans (Note 1).
- Make the cocoa mixture.In a bowl (preferably with a spout like a pyrex measuring glass), whisk the cocoa and boiling water until smooth. Set aside while you proceed to the next steps.710 grams boiling water180 grams Dutch processed cocoa
- Make the flour mixture.Make the flour mixture by sifting the flour, baking powder, baking soda, and salt in a medium bowl and whisk them together.500 grams all-purpose flour14 grams baking soda3 grams baking powder9 grams fine salt
- Make the batter. In the bowl of a stand mixer fitted with a paddle attachment, beat the butter and sugar on medium speed until light in color and fluffy, about 8 minutes. Reduce speed to medium-low then add the eggs, one at a time, beating until each addition is incorporated before adding the next one. Scrape the sides of the bowl when necessary.340 grams unsalted butter600 grams white granulated sugar300 grams eggs
- Combine the cocoa mixture and the flour mixture.Reduce speed to low. Add the flour mixture in four parts, alternating with the cocoa mixture (There is no need to wait for the cocoa mixture to be completely cool) in three parts. Beat until each addition is incorporated before adding the next. Be careful not to overmix. Divide the batter between the pans and smooth the surfaces.
- Bake the cakes.Bake for 45 to 50 minutes, or until a cake tester or toothpick inserted into the centers comes out clean. For accuracy, I like to use a food thermometer – it's done when the internal temperature is at 197-200F (92-93C). You can refer to my Complete Guide to Baked Goods Doneness Temperatures so you won't come out with undercooked baked goods again!Usually if you are using cake strips, baking time will take a bit longer. (Note 2)
- Cool the cakes.Let the cakes cool in the pans on wire racks for 1 to 1.5 hours. There's a high chance your cake will fall apart when you remove it from the pan while still warm.Run a metal spatula between the sides of the pans and invert the cakes onto wire racks that have been coated with nonstick spray. Peel off the parchment and reinvert onto wire racks to cool completely.
Hey, I need help finding the 6” recipe. I don’t have instagram but I love this recipe and need a smaller cake.
Hi, Eva. It’s under “Baking in Different Cake Pan Sizes” section of this post.
Hey , I was wondering if you measure the mls of water using kitchen scales (set to mls) or a measuring jug ? I’ve noticed they are significantly different ? I used the scales …
Thanks so much !
Great question! I measure using the scale. Although for the case of water, 70ml of water by volume (in a measuring cup) is the same as 70g by weight because water has a density of 1g per 1ml at room temperature. This 1:1 logic does not apply to all liquids (like oil, honey, or milk), because those have different densities and will weigh differently for the same volume.
Can I use this recipe to make a 10 ” birthday cake. Square shape.
Do I need to adjust the amounts.
I’m not filling the cake just icing the top
Hi, Im going to try your recipe for 7 layer cake 8″ and 4 x 6″ cake tonight and Im just going to double up ingredients so I have enough, but I note you put all purpose flour, would McDougall’s supreme sponge extra fine self raising flour be OK to use? I will need to run out to the shops if not, as it’s her 18th birthday this Sunday!
Hi, Lee! For this recipe it has to be all-purpose flour.
Fantastic recipe! I used your cake in my novelty cake and got rave reviews! It’s so moist and chocolatey I didn’t need the simple syrup at all! It was sturdy and I will be making this my ‘go to’ chocolate cake recipe! Thank you!
That makes me so happy to hear—thank you! I’m thrilled it held up well for your novelty cake and that it’s earned a spot as your go-to chocolate cake. You totally made my day! 😊
Hi, just wondering if you have this recipe for all cake sizes the same as you have for your vanilla recipe?
It’s in the works and is coming soon! If you’re subscribed you should get an email when it’s out. Thank you:)
Hi, I have been asked to bake a wedding cake and have decided on your sturdy but moist recipe because it withstands weight so well and tastes amazing. I do have a few questions I hope aren’t a bother
– I am doing a 12”,10”,8”,6” (3layers each), I have a mathematical method to know how much batter I should make but seeing your table I thought I could maybe just work out the percentage change and use that to find the amount of ingredients needed for the 10” and 8”. Do you think this would work and could be used to make 3 layers of each?
– The wedding is on a Saturday, so I am trying to work out when would be the best time to bake, currently I was thinking I could do the 12” and 10” on Thursday evening and put them in the fridge/freezer (<— whichever you think is better) and back the 8” and 6” on Friday evening. I would take the cake partially stacked up to the venue and finish there as I know I’ll have time.
I hope this all makes sense but let me know if not. Thank you again for this lovely recipe.
Thea
I’m in the process of finishing the sturdy chocolate cake recipe in different sizes (4 to 12 inches). If you’re subscribed to my email list, you should get an email when it’s out. About your timeline, I think that should work. I would keep the first batch in the freezer and would use a simple syrup on the cake layers to ensure moist cakes. I shared my process in my DIY wedding cake post. https://thebakeologie.com/diy-wedding-cake/
Hi Trish,
Thank you for your speed response, I am however wanting to ganache and then place fondant on top. So I shall freeze once cooled down and then defrost tomorrow morning/evening.
another question; Two can pans fit comfortably on the middle rack, the third one only just, so should I put that on a lower level?
I would wait for the first 2 pans to finish, then bake the last one immediately after. I find that cakes cook more evenly this way. Enjoy!:)
Hi I am going to be baking the 3 x 8 inch version tomorrow night. It states that that you can keep it in the fridge for 2 days then freeze. My question is should I bake then freeze the layers immediately and then take them out on Friday to fill and decorate for a Confirmation on Sunday?
Hi, Rachel. Once the cakes have completely cooled you can wrap them well with cling/ saran wrap then freeze it immediately. Thaw overnight in the fridge before staring to cut and frost them. So if decorating it on Sunday, move the frozen cake to the fridge on Saturday.
Hi, I love this recipe and have used it for a couple of celebration cakes as well as a wedding cake. Had loads of compliments so thank you. Just one query, I usually use stork baking spread – other brands are available lol (in UK). I wondered if there would be more of a benefit for me in using actual butter as in the recipe? Might stop it being so
crumbly? Not sure why I’m asking really, might just try it quickly. Oh and it freezes beautifully so thank you 😊
Hi there! I’m so glad you love the recipe and that it’s been a hit for your celebration and wedding cakes! I always use pure butter when making this cake, so I haven’t tried it with baking spreads like Stork. Generally, butter tends to give a richer flavor and a more tender crumb compared to margarine or baking spreads, which might help reduce crumbliness. Since Stork is known for producing light and fluffy cakes, it might be worth trying the recipe with butter to see if you notice a difference in texture and stability. If you do give it a go, I’d love to hear how it turns out! Thanks again for your lovely feedback. 🙂